viernes, 18 de mayo de 2012

Freebies Cluster and Cluster Frame *Mom and Me*

Made with the kit: Mom & Me by  Inzpired Creationz. You can find the kit here
The files are in PSD and PSP
thanks for looking (=
***click in the preview to see it in original size***
DOWNLOAD

**new link here DOWNLOAD

DOWNLOAD

**new link here DOWNLOAD

miércoles, 16 de mayo de 2012

Rustiq Luv Forum set


Supplies Needed:
Psp
Tube of choice. I am using a tube by Dominic Marco (from CILM), you can purchase the new tubes: here
Scrap kit (PTU) Rustiq Luv by Karra's Kreative Korner: here
Plugin: Eyecandy 4000
flymeadow animation by Lovey here
Font here


Open a new image: 600x200

open the paper: KKpaper11. c/p in the canvas.
Open: KK_rope heart. c/p in the canvas. Resize at 55 percent - Smart Size.
Duplicate. Image - Mirror. Merge Down.with the magic wand, click inside of both hearts. 
Selections - Modify - Expand by: 5.

Open: KKpaper06. c/p in the canvas, move the layer below the frames.
Open: KKpaper4. c/p in the canvas. Resize if desired. In the layer palette, change the blend mode to: Darken
Merge down the layers. Edit - Clear. Deselect. 
Effects - Texture Effects - Blinds:

Open the tube. c/p in the canvas. Resize if needed. Place it in the center of the banner.
Duplicate. Apply gaussian blur: radius by: 2 pixels.
In the layer palette, change the blend mode to: Soft Light.
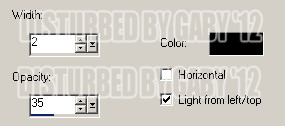
Select the original tube layer and Add drop shadow:
Add drop shadow:
V: 1 H: 3
O: 55 B: 5

Open: KK_flower4. c/p in the canvas. Move it to the left side. Duplicate. Image - Mirror.
Open: KK_fence.c/p in the canvas. Resize if needed. place it at the bottom of the banner and above the tube.
Open: KK_grass. c/p in the canvas. place it at the bottom of the banner.

Add more elements the tag:
KK_basket
KK_boots
KK_brad1
KK_butterfly
KK_button2
KK_charm1
KK_flower1
KK_heart1
KK_heart2
KK_leaves1
KK_leaves2
KK_ribbon1
KK_scatter
KK_sparkles

Always: Resize, sharpen and place as desire. 
Add drop shadow:
V: 2 H: 4
O: 30 B: 4

Add copyright, your name and a frame. Mine is about 3 pixels. 
Now you can start to merge the background and elements below the paper from the heart frame.
Leave the paper from the frame heart alone.
Merge the elements above the frame, tube included and until the fence. 
Merge the elements above the the fence, grass layer and the rest of elements, included the frame.

You will have four layers and if you like rename it. This is my layer palette:

To animate:

Close the layer: frame, grass and elements (top layer)

Activate the layer: heart frame paper

Effects - Plugins - Eyecandy 4000 - Hsb Noise:

Edit - Copy Merged. Open Animation Shop. Paste as a new animation and paste after current frame.
Back to psp. Edit - Undo. Apply HSB Noise again but change the random seed.
I've used: 290, 888, 454
Always paste the frame twice. Now you have 8 frames. Edit -  Select all. 
Copy. Click in the last frame. Paste after current frame. You have 16 frames.
Activate the first frame and select all.

Open the animation: flymeadow-madebylovey'11.mng It have: 20 frames. Delete the first 4 frames. 
Select all the frames. Animation - Resize animation:
85 percent - Bicubic. Crop if needed.
Select all the frames and drag it to your first animtion. Posicion it above the fence.

Back to psp. Open the closed layer: frame, grass and elements (top layer)
Copy. Go to animation shop: Paste as a new animation and duplicate until you have 16 frames.
Edit - Select All and gently drag it above the banner.
If you like save and you're done.

Rustiq Luv Tag

Supplies Needed:
Psp
Tube of choice. I am using a tube by Dominic Marco (from CILM), you can purchase the new tubes: here
Scrap kit (PTU) Rustiq Luv by Karra's Kreative Korner: here
Plugin: Eyecandy 4000
Font here


Open a new image: 650x650.

open the paper: KKpaper13. c/p in the canvas. 
Layers - Load mask: lyndiemask038 - Merge group. (orientation: fit to layer)

Duplicate the layer, Apply Gaussian blur, Radius: 7
Add Noise:
Uniform
60 percent
monochrome

open: KK_frame2. c/p in the canvas. Resize if needed. click outside of the frame.
Selections - Modify - Expand by 3.
Open: KKpaper11. c/p in the canvas, move the layer below the frame.
Edit - Clear. 

Remove the excess of the paper:

Open: KK_rope heart. c/p in the canvas. with the magic wand, click inside. 
Selections - Modify - Expand by: 5.
Open: KKpaper06. c/p in the canvas, move the layer below the frame.
Edit - Clear. Deselect. 
Effects - Texture Effects - Blinds:

Effects - Plugins - Eyecandy 4000 - Hsb Noise:

Open the tube. c/p in the center of the tag. Move it below the frame. Duplicate move above the frame and eraser the excess.
Select the layer behind the frame and Add drop shadow:
V: 2 H: 5
O: 40 B: 7

Open: KK_leaves1. c/p in the canvas. Resize at 50 percent. 
Move it to the right side of the frame. Duplicate.
Image - Flip. Image - Free Rotate - Right 20 degrees. Place it

Open: KK_flower4. c/p in the canvas, resize and place it above the top leaves.
Open: KK_flower3. c/p in the canvas, resize and move it to the right side, duplicate. 
Image - Flip and place it.
Open: KK_flower2. c/p in the canvas, resize and place it above the top leaves.

Add more elements the tag:
KK_basket
KK_boots
KK_butterfly
KK_button2
KK_charm1
KK_flower1
KK_heart1
KK_heart2
KK_ribbon1

Always: Resize, sharpen and place as desire. 
Add drop shadow:
V: 4 H: 4
O: 40 B: 4

Add copyright and your name. Merge Visible, copy and paste as new image. Export as a png or jpg.

Bling it on Bitch

Supplies Needed:
Psp
Tube of choice. I am using a tube by Alexander McMillan, you can purchase the tube: here
Scrap kit (PTU) Trashy Baby by SkyScraps: here
Plugin: Xero: Radiance here
Font here

Open a new image: 650x650

Open: SkyScraps-TB-F4. c/p in the canvas. Duplicate and apply:
Effects - Edge Effects - Find all
Merge the frame layers.

with the magic wand, click inside of the two big metal frames. 
Selections - Modify - Expand by: 5.

Open: SkyScraps-TB-pp8. c/p in the canvas. Move the layer below the frame.
Selections -  Invert. Edit - Clear. Deselect.

Now select the two little rectangles.
Selections - Modify - Expand by: 5.
Open: SkyScraps-TB-pp4. c/p in the canvas. Move the layer below the frame.
Selections -  Invert. Edit - Clear. Deselect.
Adjust - Hue and Saturation -  Colorize:
Hue: 241
Saturation: 191

Open the closeup of the tube, c/p in the canvas, move it to the big left frame.
Remove the excess of the tube and Colorize to black and white. 

Effects - Plugins - Xero - Radiance:

Effects - Artistic Effects - Halftone:

In the layer palette, change the blend mode to: Lighten (or Screen)

Screen:

Open the tube, c/p in the canvas, resize if is needed. Move it to the right side of the image.
Duplicate, apply gaussian blur: radius by: 5 pixels.
In the layer palette, change the blend mode to: Overlay. Low the opacity to: 85.
Select the original tube layer and Add drop shadow:
V: 2 H: 5
O: 55 B: 5

Open: SkyScraps-TB-E51. c/p in the canvas, move it below the tube and a little to the right side.
Open: SkyScraps-TB-E52. c/p in the canvas, Resize and place it in the top left 
Open: SkyScraps-TB-E56. c/p in the canvas, place it above the tube and remove the excess, duplicate.

Add more elements the tag:
SkyScraps-TB-F3 (resize and send to bottom)
SkyScraps-TB-E5
SkyScraps-TB-E7
SkyScraps-TB-E13
SkyScraps-TB-E14
SkyScraps-TB-E19
SkyScraps-TB-E23
SkyScraps-TB-E26
SkyScraps-TB-E36
SkyScraps-TB-E38
SkyScraps-TB-E41

Always: Resize, sharpen and place as desire. 
Add drop shadow:
V: 2 H: 2
O: 40 B: 4

Add copyright and your name. Merge Visible, copy and paste as new image. Export as a png or jpg.

martes, 15 de mayo de 2012

Keep it fresh

Supplies Needed: 
PSP 
Tube of choice. I am using one by Zebrush exclusive to PFD. You can find the tubes here
Cluster frame by me made with the scrap BadAzz by Bibi's Collections : here
Plugin: Xenofex Constellation
Font here

Open the cluster. Delete the credits layer.
Resize at 80 percent, Smart Size.

with the magic wand, click inside of the three metal frames. Selections - Modify - Expand by: 3.
Open the closeup of the tube, c/p in the canvas, move the layer below the cluster.
Select the a part for each frame. Merge these layers together. Duplicate.
Apply Gaussian blur, Radius: 3. In the layer palette, change the blend mode to: Overlay.
Make a gradient with two colors from your tube:
Foreground: #7604d1
Background: #030203
Angle: 90
Repeats: 1
Invert: Unchecked
Style: Linear

Again, click inside of the three frames. Expand by 3 pixels.
Add a new layer floodfill with the gradient.
Effects - Texture Effects - Blinds: 

Effects - Plugins - Xenofex - Constellation:

In the layer palette, change the blend mode to: Lighten.

with the magic wand click in the top frame, Expand by 3 pixels.
Open: BADazz Papers (14). c/p in the canvas, resize at 50 percent. Selections - Invert. Edit - Clear.
Add more elements to decore if you like.

Add copyright and your name. Merge Visible, copy and paste as new image. Export as a png or jpg.

Sht Happens

Supplies Needed: 
PSP 
Tube of choice. I am using one by SkyScraps. You can purchase the tubes here
Cluster frame by me made with the scrap BadAzz by Bibi's Collections : here
Mask by Creative Misfits: here
Plugin: Xero: Bad Dream here
Font here


Open the cluster. Duplicate the file.
Delete the layer: Info
Resize at 80 percent, Smart Size. 

Open the paper: BADazz Papers (1). Colorize to match your tube.
Adjust - Colorize - Hue and Saturation:
Hue: 195
Saturation: 65

Opent the close up of the tube, c/p in the canvas. Place in the center.
Effects - Plugins - Xero - Bad Dream:
In the layer palette,change the blend mode to: overlay

Merge Down (closeup and paper)

Apply the mask: MakeAMaskDiamondMF04Slow2009. Merge group.  

Open the tube, resize if needed. Place it in the left side of the image.
Duplicate. Apply Gaussian blur, Radius: 2
Apply Xero - Bad Dram again.

In the layer palette,change the blend mode to: Screen
Select the original tube layer and Add drop shadow:
V: 0 H: 3
O: 60 B: 7

Add copyright and your name. Merge Visible, copy and paste as new image. Export as a png or jpg. 

Cluster and Cluster Frame: BadAzz

Made with the kit: BadAzz by  Bibi's Collections. You can find the kit here
The file are in PSD and PSP.
thanks for looking (=
***click in the preview to see it in original size***

DOWNLOAD

DOWNLOAD