jueves, 18 de octubre de 2012

Victorian Scent


Supplies Needed:
Psp and Animation Shop.
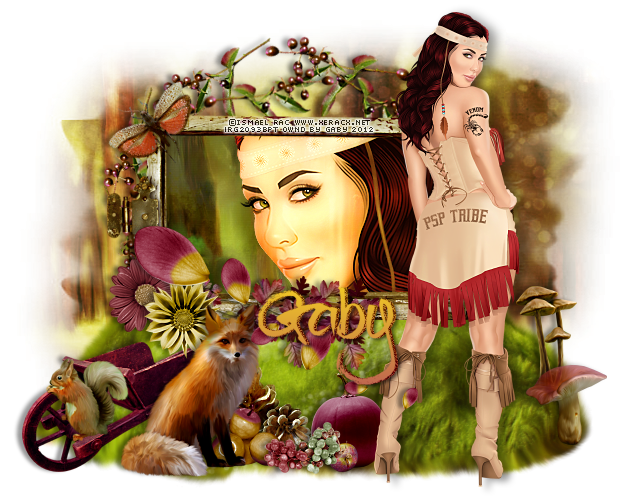
Tube of choice. Art by SkyScraps, purchase it here
Scrap kit (PTU) Victorian Goth by Bibis Collection here
Animation starspinner by Lovey here
Eyecandy 4000
Font here


Open a new image: 600x450

Open: BIBIVICTORIANGOTH (38). c/p in the canvas. Resize: 85 percent - Smart Size.
With the magic wand click outside the frame. Selections - Modify - Expand: 5 pixels.
Invert the selection.

Open: BIBIVICTORIANGOTH PAPER (4). c/p in the canvas. Resize: 50 percent - Smart Size.
Move the layer below the frame. 

Open the tube, c/p in the canvas, place it in the center of the frame. 
Selections - Invert. Remove the excess outside of the frame.
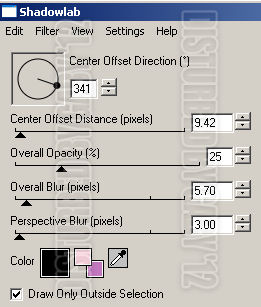
Effects - Plugins - Eyecandy 4000 - Shadow Lab:

Open: BIBIVICTORIANGOTH (53). c/p in the canvas. Resize: 60 percent - Smart Size.
Free Rotate: Right 25. Place it in the right bottom corner of the frame.

Open: BIBIVICTORIANGOTH (50). c/p in the canvas. Resize: 40 percent - Smart Size.
Place it in the left bottom corner of the frame. Duplicate. Image - Mirror.

Open: BIBIVICTORIANGOTH (20). c/p in the canvas. Resize: 20 percent - Smart Size.
Place it above the leaves, in the center. Duplicate. Image - Mirror.

Open: BIBIVICTORIANGOTH (1). c/p in the canvas. Resize: 50 percent - Smart Size.
Place it in the left side, at the bottom.

Open: BIBIVICTORIANGOTH (59).  c/p in the canvas. Resize: 40 percent - Smart Size.
Place it in the left side of the frame.

Open: BIBIVICTORIANGOTH (60). c/p in the canvas. Resize: 30 percent - Smart Size.
Place it around the frame.

Sharpen the elements, apply the same shadow used for the elements.

Add the copyright info and your name.

Open: BIBIVICTORIANGOTH (47).  c/p in the canvas. Resize: 50 percent - Smart Size.
Move the layer above the tube.

Activate the Selection tool:

Make a selection around the right curtain:

Drag it to the right, do the same for the left:

Activate the background layer. Selections - All - Float - Defloat.
Activate the curtain layer. Selections - Invert. Edit - Clear.

**Note: When you apply the filter to create the animation, it's possible, a part of the curtains
goes outside of the frame, remove with the eraser tool.

To animate:

with the curtain layer active.
Effects - Plugins - Eyecandy 4000 - Jiggle:

Copy merged the tag.
Open animation Shop, paste as a new animation, twice. 
**Optional if you don't want to add another animation.

Back to psp. Undo the effect, apply again, but hit the random seed button,
Apply, copy merged, paste (once or twice) after current frame.
Repeat 3 more times. 
I have 10 frames in animation shop. 
Activate the first frame. Edit - Select All. 
Copy, click in the last frame, paste after current frame, do it once more.
Now you have 30 frames.

Open the animation: starspinner-madebylovey'11.mng
Resize at 50 percent - Smart Size. Delete the first frame
Select all the frames and drag it to the first animation.
Place it in the frame, twice.
Play the animation. 

**Adding a background to the transparent animation.

Animation - Animation Propieties
Change the black color for the color of your choice, mine is white:

Apply and the color will be applied in all the frames selected :)
If you like  it save and you're done.

PSP Tribe


Supplies Needed:
Psp & Animation Shop
Tube of choice. Art by Ismael Rac, soon to be released here
Scrap kit (PTU) Early Fall by Inzpired Creationz here
Eyecandy 4000
Muras Meister 
Xero here
Font here


Open a new image: 630x500

Open the paper: 3. c/p in the canvas. Resize at 80 percent - Smart Size.

Layers - Load mask: gemsmasks - 72

Merge group. Image -  Flip.

Duplicate the layer. 
Effects - Plugins -  Xero - Radiance

Default settings.

Open: Grassy Hill.png. C/p in the canvas. Resize at 85 percent - Smart Size.
Place it at the bottom of the canvas.

Open: Frame 2. C/p in the canvas. Resize at 40 percent - Smart Size.
Place it at the top the hill. With the magic wand click inside of the frames. 
Selections - Modify - Expand: 10 pixels.

Open the paper: 3. c/p in the canvas. Resize at 50 percent - Smart Size.
Place it behind the frame. 

Opent he closeup of the tube, c/p in the canvas, place it in the frame.
Effects - Plugins -  Xero - Porcelain:

In the layer palette, change the blend mode to: Hard Light.

Selections - Invert. Edit - Clear to remove the excess. Do the same for the paper.
Deselect.

Open: Berry Sprig 1. C/p in the canvas. Resize at 40 percent - Smart Size.
Place it in the center of the canvas. Rotate: 35 degrees to right.

Effects - Plugins - Mura's Meister - Copies:

Move the layer above the mask.Arrange around the frame:

Duplicate. Resize at 90 percent. Image - Flip.

Result:

Open: Leaves 1. C/p in the canvas. Resize at 50 percent - Smart Size.
Place it in the left bottom corner of the frame. Duplicate and move more to the left.

Open: Flower 1.  C/p in the canvas. Resize at 20 percent - Smart Size.
Place it at the bottom left corner of the frame, above the leaves.

Open: Flower 2.  C/p in the canvas. Resize at 20 percent - Smart Size.
Place it next to the first flower.

Open: Wheelbarrel. C/p in the canvas. Resize at 50 percent - Smart Size.
Place it in the left side of the hill.

Open: Critter 1. C/p in the canvas. Resize at 20 percent - Smart Size.
Place it in the wheelbarrel.

Open: Critter 2. C/p in the canvas. Resize at 40 percent - Smart Size.
Place it next to the wheelbarrel.

Open: Scattered Petals. C/p in the canvas. Resize at 40 percent - Smart Size.
Place it in the center. Rotate: 90 degrees to right.

Open: Mushrooms 1. C/p in the canvas. Resize at 40 percent - Smart Size.
Place it in the right side of the hill.

Open: Mushroom 1. C/p in the canvas. Resize at 20 percent - Smart Size.
Place it below the mushrooms.

Open: Moth. C/p in the canvas. Resize at 25 percent - Smart Size.
Place it at the top left corner of the frame. Rotate: 25 degrees to left.

Add more elements the tag:

Fruit 1
Fruit 2
Pinecones


Sharpen the elements, apply Shadow.
Effects - Plugins - Eyecandy 4000 - Shadowlab:

Open the tube, c/p in the canvas, place it in the right side of the canvas. 
Effects - Plugins - Eyecandy 4000 - Shadowlab:

Add copyright and your name. Merge Visible, copy and paste as new image. Export as a png or jpg.

miércoles, 17 de octubre de 2012

Demonic Seduction


Supplies Needed:
Psp & Animation Shop
Tube of choice. Art by Barbara Jesen, pruchase it here
Scrap kit (PTU) Demon Night by Inzpired Creationz here
Eyecandy 4000
Font here


Open a new image: 600x200

Open the paper: 1. c/p in the canvas, resize at 60 percent - Smart Size.

Open the tube, c/p in the canvas, resize if it's needed. Place it in the left side.
Add drop shadow:
V: 5 H: 5
O: 70 B: 10

Open: Window 2. c/p in the canvas, resize at 70 percent - Smart Size.
Image - Rotate - Free Rotate: 25 degrees to the right.
Move the layer below the tube.

Open: Creepy Hand. C/p in the canvas, resize at 30 percent - Smart Size.
Place it next to the tube.

Open: Web 1. C/p in the canvas, place it in the right side.

Open: Axe. C/p in the canvas, resize at 50 percent - Smart Size.
Place it in the right side above the web.

Open: Headstone 4. C/p in the canvas, resize at 40 percent - Smart Size.
Place it in the right side.

Open: Headstone 3. C/p in the canvas, resize at 35 percent - Smart Size.
Place it in next to the first headstone.

Open: Tree 1. C/p in the canvas, resize at 70 percent - Smart Size.
Place it above the headstones but don't cover them totally.

Open: Spider 1. C/p in the canvas, resize at 30 percent - Smart Size.
Place it above the tree in the top right. Image - Rotate - Free Rotate: 40 degrees to the right.

Open: Grass 1. C/p in the canvas, resize at 50 percent - Smart Size.
Place it at the bottom mid left of the banner, duplicate and place it next.

Open: Coffin 2. C/p in the canvas, resize at 60 percent - Smart Size.
Place it at the bottom and above the grass in the right side.

Open: Lantern. C/p in the canvas, resize at 20 percent - Smart Size.
Place it above the coffin.

Open: Dog. C/p in the canvas, resize at 50 percent - Smart Size.
Place it in the right corner.

Open: Blood Splatter 2. C/p in the canvas, resize at 50 percent - Smart Size.
Place it in the left bottom corner. Duplicate. Image - Flip. Arrange.

Open: Blood Splatter 1. C/p in the canvas, resize at 30 percent - Smart Size.
Place it in the bottom center. 

Sharpen the elements, apply Shadow.
Effects - Plugins - Eyecandy 4000 - Shadowlab:

Add a frame, copyright and your name. You can: Merge Visible, copy and paste as new image. Export as a png or jpg.

To animate: 
Open: Handprint. Resize at 18 percent - Smart Size. Copy.
Close the original and don't save the changes.

Open animation shop, paste as a new animation.
Create a new animation: 100x100 pixels. Transparent Background.
Move the handprint to a the new animation. Free space around the element is needed.
Effects - Insert Image Transition:

With all the frames selected. 
Go to: Animation - Reverse Frames.

Edit - Copy. Click in the last frame, delete. Paste after current frame. 
Again. Go to: Animation - Reverse Frames.

Select all the frames, change the speed to: 11.
Activate the frame: 11 or 12. change the speed to: 80

Back to psp, Copy the banner, in animation shop: Paste as a new animation.
Duplicate until you have 21 frames (same quantity of frames as the handprint)

Activate the handprint animation, select all the frames, activate the first and drag it
into the main banner, place it where you want it. Remember to change the speed of the frames.
You're done :)

Gate to a purrrfect heaven


Supplies Needed:
Psp
Tube of choice. Art by RedFill, pruchase it here
Scrap kit (PTU) Kitty Heaven by Bibis Collection here
Mask 34 by Gems here
Eyecandy 4000
Penta .com
Xero here
Font here


Open a new image: 610x500

Select two colors and make a gradient.
My choice:

Foreground: #fad5e0
Background: #c278be

Style: linear
Angle: 0
Repeats: 0
Invert: checked

Open: BIBI KITTY HEAVEN PAPERS (9). c/p in the canvas. Don't resize.

Layers - Load mask: gemsmask34

Merge group. 


Open: BIBI KITTY HEAVEN ELEMENTS (3). C/p in the canvas.
With the magic wand click inside of the frames. 
Selections - Modify - Expand: 10 pixels.
Add a new layer, flood fill with the gradient.

Effects - Plugins -  Penta .com - jeans:

Open the close up of the tube, c/p in the canvas. Place it in the frames

Effects - Plugins -  Xero - Radiance:

In the layer palette, change the blend mode to: Multiply.
Duplicate. Merge down.

Open: BIBI KITTY HEAVEN ELEMENTS (25). c/p in the canvas. 
Resize at 60 percent - Smart Size. Place it in the center of the frames.

Open: BIBI KITTY HEAVEN ELEMENTS (61). c/p in the canvas.
Resize at 50 percent - Smart Size. Place it at the top of the door.

Open: BIBI KITTY HEAVEN ELEMENTS (66). c/p in the canvas.
Resize at 70 percent - Smart Size. Rotate: 30 degrees to left.
Place it in the right side of the frame.

Open: BIBI KITTY HEAVEN ELEMENTS (36). c/p in the canvas.
Resize at 70 percent - Smart Size. Rotate: 15 degrees to right.
Place it in the right side of the frame.

Open: BIBI KITTY HEAVEN ELEMENTS (52). c/p in the canvas.
Resize at 50 percent - Smart Size. Place it at the bottom of the frames.

Open: BIBI KITTY HEAVEN ELEMENTS (40).  c/p in the canvas.
Resize at 40 percent - Smart Size. Rotate: 20 degrees to right.

Open: BIBI KITTY HEAVEN ELEMENTS (63). c/p in the canvas.
Resize at 60 percent - Smart Size. Place it at the bottom of the frames, in the right side.

Open: BIBI KITTY HEAVEN ELEMENTS (1). c/p in the canvas.
Resize at 80 percent - Smart Size. Place it above the trunk.

Open: BIBI KITTY HEAVEN ELEMENTS (46). c/p in the canvas.
Resize at 60 percent - Smart Size. Place it behind the teddy.

Add more elements the tag:
BIBI KITTY HEAVEN ELEMENTS (20)
BIBI KITTY HEAVEN ELEMENTS (50)
BIBI KITTY HEAVEN ELEMENTS (57)
BIBI KITTY HEAVEN ELEMENTS (76)

Sharpen the elements, apply Shadow:

Add copyright and your name. Merge Visible, copy and paste as new image. Export as a png or jpg.