miércoles, 21 de noviembre de 2012

Winter Tears


Supplies Needed:
Psp & Animation Shop
Tube of choice. Art by Anna Marine purchase it here
Scrap kit (PTU) Black Winter by Bibis Collection here
Eye candy 4000 
Animation by Lovey here
Font here

Open a new image: 650x450

Selections - Select all.
Open: BIBIBLACKWINTER PAPERS  (3).Copy and paste into the selection. Deselect.

Open: BIBIBLACKWINTER ELEMENTS (40). C/p in the canvas, Resize at 65 percent - Smart Size.
Place it in the left side, duplicate. Image - Mirror. Merge down.
With the magic wand click inside of both frames, activate the paper layer. 
Selections - Invert. Deselect.

Open the tube, c/p in the canvas, resize and place it in the center.
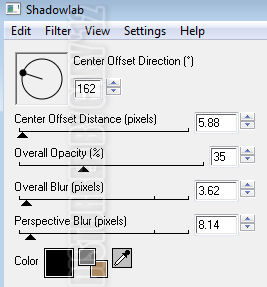
Effects - Plugins - Eyecandy 4000 - ShadowLab:


Open: BIBIBLACKWINTER ELEMENTS (49). C/p in the canvas, Place it above the tube.

Open: BIBIBLACKWINTER ELEMENTS (114). C/p in the canvas, Resize at 70 percent - Smart Size.
Place it above the tube.

Open: BIBIBLACKWINTER ELEMENTS (10). C/p in the canvas, Resize at 95 percent - Smart Size.
Place it at the bottom and with the eraser tool remove any excess.

Open: BIBIBLACKWINTER ELEMENTS (95). C/p in the canvas, Resize at 40 percent - Smart Size.
Place it in the right bottom side. 

Open: BIBIBLACKWINTER ELEMENTS (14). C/p in the canvas, Resize at 50 percent - Smart Size.
Place it at the bottom left. Image - Free Rotate: 30 degrees - Left.
Duplicate. Image - Mirror.

Open: BIBIBLACKWINTER ELEMENTS (9). C/p in the canvas, Resize at 35 percent - Smart Size.
Place it at the bottom left. Duplicate. Image - Mirror.

Open: BIBIBLACKWINTER ELEMENTS (31). C/p in the canvas, Resize at 30 percent - Smart Size.
Place it in the left side. Duplicate. Image - Mirror. Place it in the bottom right side.

Open: BIBIBLACKWINTER ELEMENTS (64). C/p in the canvas, Resize at 30 percent - Smart Size.
Place it in the left, below the flower.

Open: BIBIBLACKWINTER ELEMENTS (55). C/p in the canvas, Resize at 30 percent - Smart Size.
Place it in the bottom almost center. Duplicate. Image - Mirror. Image - Flip. Arrange at the bottom.

Open: BIBIBLACKWINTER ELEMENTS (113). C/p in the canvas, Resize at 35 percent - Smart Size.
Place it in the left, next to the first flower. Duplicate. Image - Mirror.

Open: BIBIBLACKWINTER ELEMENTS (32). C/p in the canvas, Resize at 30 percent - Smart Size.
Place it at the bottom left. Image - Free Rotate: 30 degrees - Left.

Open: BIBIBLACKWINTER ELEMENTS (99). C/p in the canvas, Resize at 25 percent - Smart Size.
Place it at the bottom center. Image - Free Rotate: 80 degrees - Left. Duplicate. Image - Mirror.

Open: BIBIBLACKWINTER ELEMENTS (44). C/p in the canvas, Resize at 35 percent - Smart Size. Twice.
Place it at the bottom center. 

Open: BIBIBLACKWINTER ELEMENTS (57). C/p in the canvas, Resize at 30 percent - Smart Size. 
Place it at the bottom of the wordart. 

Add more elements to decorate the tag:
BIBIBLACKWINTER ELEMENTS (4)
BIBIBLACKWINTER ELEMENTS (6)
BIBIBLACKWINTER ELEMENTS (7)
BIBIBLACKWINTER ELEMENTS (20)
BIBIBLACKWINTER ELEMENTS (52)
BIBIBLACKWINTER ELEMENTS (58)
BIBIBLACKWINTER ELEMENTS (63)
BIBIBLACKWINTER ELEMENTS (66)
BIBIBLACKWINTER ELEMENTS (79)
BIBIBLACKWINTER ELEMENTS (83)

Always: Resize, sharpen and place as desire. 
Effects - Plugins - Eyecandy 4000 - ShadowLab:

Add copyright and your name.

To animate:

Merge down the paper and any other decoration below the frame layer. Close it. 
Merge visible all the open layers. Copy and open animation shop.
Paste as a new animation, Duplicate until you have 23 frames.

back to psp, close the open layer and open the merged paper layer. 
In  animation shop paste as a new animation, duplicate until you have 23 frames.

Open: squarestar-bylovey'10. Animation - Cull Animation:
Remove 1 frame every 4 frames.

Activate the first frame, drag it to the paper animation.
place it in the left side, I've placed mine above the crosses. 
Undo drag the animation, place it again but in the right side.

Activate the top part of the tag (frames, tube, name, deco).
Select all the frames and drag into your main tag, place it above.

**Adding a background to the transparent animation.

Animation - Animation Propieties
Change the black color for the color of your choice, mine is white:

Apply and the color will be applied in all the frames selected :)
If you like  it save and you're done.

This is the night


Supplies Needed:
Psp and Animation Shop
Tube of choice. Art by Deborah Grieves. Purchase the tube: here
Forum set 018 by me PSP PSD here or here or here
Plugins:
Eye candy 3.1
Xero Plugin here
Xenofex 2
Font here


Open the template. Duplicate the file and close the original.
Delete the layer: credits

make a gradient with two colors: 
foreground: #1c617d
background : #09153e
angle: 0
repeats: 6

Invert: unchecked.

Activate the layer: main background.
flood fill with the gradient.

Effects - Plugins - Eye Candy 3 - Jiggle:


Add another layer, flood fill with the gradient.
Effects - Plugins - Eye Candy 3 - Jiggle:

In the layer palette change the blend mode to: Hard Light.
Adjust - Add/Remove Noise - Add Noise:
Random
10 percent
Monochrome

Activate the main background, duplicate and move to the top. 
change the blend mode to hard light too. Rename it: Bling

Activate the layer: frame back 1.
Change the color for one of your choice, I leave mine grey.
Selections - All  - Float - Defloat.

Open the tube or close up, copy and paste as a new layer, place it above the background.
Selections - Invert. Edit - Clear. Deselect.

Effects - Plugins - Xero - Radiance:

Repeat for the layer: frame back 2.

Activate the layer: small frame 1.
Selections - All  - Float - Defloat.Delete the original layer.
Add a new layer and flood fill with the color: #053d59.

Adjust - Add/Remove Noise - Add Noise:
Uniform
57 percent
Monochrome

Add drop shadow:
V: 3 H: 3
O: 80 B: 6

Repeat for the layer: small frame 2.

Activate the layer: rectangle.
Selections - All  - Float - Defloat.Delete the original layer.
Add a new layer and flood fill with the color: #053d59.

Effects - Texture Effects - Blinds:

Add drop shadow:
V: 3 H: 0
O: 70 B: 4

Open the tube, c/p in the canvas, place it in the right side.
Apply shadow if you like.

Change the colors of the frames, I've added noise to the frame: 1.
Add the copyright info and your name.

To animate:

Activate the layer: Blings.
Effects - Plugins - Xenofex 2 - Constellation:

Copy merged. Open Animation shop.
Paste as a new animation. Back to psp, undo the effect and apply again
but hit the random seed button. Copy merged, in animation shop paste after current frame.
Repeat one more time. Change the speed to: 15

Play the animation, if you like it, save!
You're done :D


martes, 20 de noviembre de 2012

A toast for the good times


Supplies Needed:
Psp & Animation Shop
Tube of choice. Art by VeryMany purchase it here
Scrap kit (PTU) Xmas by Bibis Collection here
Eye candy 4000 
Animation by Simone here
Font here


Open a new image: 600x200.

With the magic wand, click inside.
Open the paper: BIBIXMAS PAPERS (10). C/p in the canvas, Resize at 50 percent - Smart Size.
Place it in the canvas. Selections - Invert. Edit - Clear. Deselect.
Open the tube, c/p in the canvas, resize if it's needed and place it in the right side.

Open: BIBI XMAS ELEMENTS (33). Place it behind the tube at the top, duplicate and move it 
to the bottom.

Open: BIBI XMAS ELEMENTS (18). Place it behind the tube at the top.

Open: BIBI XMAS ELEMENTS (66). C/p in the canvas. Image - Mirror. Place it in the left side.

Open: BIBI XMAS ELEMENTS (26). C/p in the canvas, Resize at 30 percent - Smart Size.
Place it in the left side, at the bottom above the tree.

Open: BIBI XMAS ELEMENTS (20). C/p in the canvas, Resize at 30 percent - Smart Size.
Place it in the left side, at the bottom.

Open: BIBI XMAS ELEMENTS (35).  C/p in the canvas, Resize at 40 percent - Smart Size. Twice
Place it in the left side at the bottom, next to the box.

Open: BIBI XMAS ELEMENTS (11). C/p in the canvas, Resize at 40 percent - Smart Size.
Place it in the left bottom corner.

Open: BIBI XMAS ELEMENTS (23). C/p in the canvas, Resize at 40 percent - Smart Size.
Place it in the left bottom, next to the red star.

Open: BIBI XMAS ELEMENTS (25). C/p in the canvas, Resize at 40 percent - Smart Size.
Place it in the left bottom, next to the bauble.

Open: BIBI XMAS ELEMENTS (83). C/p in the canvas, Resize at 30 percent - Smart Size.
Place it in the bottom, next to the cupcake.

Open: BIBI XMAS ELEMENTS (5). C/p in the canvas, Resize at 40 percent - Smart Size.
Place it in the bottom, behind the gold ornament. Image - Free Rotate: 50 degrees - left.

Open: BIBI XMAS ELEMENTS (73). C/p in the canvas, Resize at 50 percent - Smart Size.
Place it in the bottom, next to the gold ornament.

Add more elements to decorate:
BIBI XMAS ELEMENTS (2)
BIBI XMAS ELEMENTS (4)
BIBI XMAS ELEMENTS (9)
BIBI XMAS ELEMENTS (89)
BIBI XMAS ELEMENTS (99)
Sharpen the elements and apply shadow.
Effects - Plugins - Eyecandy 4000 - Shadowlab:

Add copyright, name and a frame. Hide the paper layer and merge the rest.

To animate:
Activate the paper layer and with the magic wand:

click in the branches of the tree, in some parts you will need to hold the shift key 
to select small parts, my selection:

Optional:
Add drop shadow:
V: 2 H: 2
O: 85 B: 7

The shadow looks nice (= Duplicate two more times and close this layers.
Adjust - Add/Remove Noise - Add Noise:
Uniform
30 percent
Monochrome

Activate (don't open) the first copy, apply noise but change the percent to: 42.
Activate the last copy and apply noise, but change the percent to: 35.
Deselect. Copy merged.

Open animation shop, paste, back to psp close the original paper layer, open the first copy, 
copy merged, in animation shop, paste after current frame, back to psp, open the last paper layer.
Copy merged and go to animation shop and paste after current frame.
Activate the first frame and select the 3 frames, copy click in the last frame, paste after current frame.
Click in the last frame and paste again, repeat until you have 24 frames.

Open: PixieDustSimone008.pspimage. Animation - Cull Animation:
Remove: 1 frame every 3 frames.

You will have 24 frames. Drag the animation to the center of the banner.

Go to psp and Copy the merged layer with the decoration, tube and name. Paste in animation shop
duplicate until you have 24 frames, activate the first frame and select all.
Drag into your main banner and place it. Change the speed to: 13 

Play the animation if you like, save and you're done :)

Not so emo christmas


Supplies Needed:
Psp & Animation Shop
Tube of choice. Art by Jose Cano purchase it here
Scrap kit (PTU) Emo Christmas by Pink Popcorn Designs here
Xero - Radiance here
Animation by Lovey here
Font here


Open a new image: 650x400

Open: Emo Christmas (66). c/p in the canvas, resize at 45 percent -  Smart Size.
Place it in the center and with the magic wand click inside the frame. 
Selections - Modify - Expand by: 5 pixels.

Open paper: Emo Christmas (84). Copy, add a new layer and paste into selection.
Move the layer below the frame.

Open: Emo Christmas (67). c/p in the canvas, resize at 30 percent -  Smart Size.
Image - Free Rotate: Left - 15 degrees.
Place it in the left, with the magic wand click inside the frame. 
Open paper: Emo Christmas (9). C/p in the canvas, resize at 50 percent -  Smart Size.
Open the close up of the tube, c/p, place it above the paper.
Selections - Invert. Edit - Clear. Do the same for the paper layer. Deselect.

Open: Emo Christmas (7). c/p in the canvas, resize at 50 percent -  Smart Size.
Place it in the left, above the frame.

Open: Emo Christmas (42). c/p in the canvas, resize at 25 percent -  Smart Size.
Place it in the left, next to the sign.

Open: Emo Christmas (23). c/p in the canvas, resize at 25 percent -  Smart Size.
Place it in the bottom left.

Open: Emo Christmas (29). c/p in the canvas, resize at 45 percent -  Smart Size. Twice
Place it at the bottom nex to the hat.

Open: Emo Christmas (47). c/p in the canvas, resize at 30 percent -  Smart Size. Twice
Place it at the bottom of the two frames.

Open: Emo Christmas (60). c/p in the canvas, resize at 66 percent -  Smart Size. Twice
Place it at the right side, next to the frame.

Open: Emo Christmas (15). c/p in the canvas, resize at 30 percent -  Smart Size. Twice
Place it at the right side, at the bottom of the tree.

Open: Emo Christmas (36). c/p in the canvas, resize at 25 percent -  Smart Size. Twice
Image - Mirror. Place it at the right side, behind the cake.

Open: Emo Christmas (10).  c/p in the canvas, resize at 25 percent -  Smart Size. Twice
Image - Mirror. Place it at the bottom of the cake.

Open the tube, c/p in the canvas, resize if it's needed. Place it in the right side of the tag
Effects - Plugins - Eyecandy 4000 - ShadowLab:

Add more elements to decorate the tag:
Emo Christmas (9)
Emo Christmas (18)
Emo Christmas (19)
Emo Christmas (20)
Emo Christmas (21)
Emo Christmas (22)
Emo Christmas (44)
Emo Christmas (46)

Always: Resize, sharpen and place as desire. 
Effects - Plugins - Eyecandy 4000 - ShadowLab:

Add copyright and your name. 
Merge the papers, close up, frames and the decoration in the background. Close the layer.
Merge visible all the open layers. Activate the merged frames. 
Copy merged, open animation shop, paste as a new animation. Duplicate until you have 16 frames.

Open: softglows-madebylovey'11. Delete the first 3 frames. Select all, and drag them into your tag
Place it in the big frame, twice. Back to psp, close the open frame layer and open the layer with the tube
and elements. Copy merged, in animation shop, paste as a new animation. Duplicate until you have 16 frames.
Select all the frames, and drag into your tag, place it where it belongs.
**Adding a background to the transparent animation.

Animation - Animation Propieties
Change the black color for the color of your choice, mine is white:

Apply and the color will be applied in all the frames selected
Play the animation , if you like save and you're done :)

domingo, 18 de noviembre de 2012

There is Hope


Supplies Needed:
Psp & Animation Shop
Tube of choice. Art by SkyScraps purchase it here
Scrap kit (PTU) Thetys by Scrapz n Pleazure here
Xero - Radiance here
Animation by Patricia here
Font here


Open a new image: 600x200

Selections -  All. 
Open paper: SNP-tethys-papers08. c/p in the canvas. Selections - Modify - Contract: 20 pixels.
Open the close up, c/p in the canvas. Place it in the left. Remove the excess.
Add a new layer. Effects - 3D effects - Cutout. 

Open paper: SNP-tethys-papers03. c/p in the canvas. Selections - Invert. Edit - Clear.
Selections - Invert, again. Selections - Modify - Contract: 2 pixels. Edit -  Clear.
Deselect.
Effects - Plugins - Xero - Radiance:

In the layer palette change the blend mode to: luminance.

Open: SNP-tethys-elements16. c/p in the canvas, Resize at 25 percent - Smart Size.
Place it in the left side. 

Open: SNP-tethys-elements14. c/p in the canvas, Resize at 50 percent - Smart Size.
Place it in the left side, above the pillar.

Open: SNP-tethys-elements17. c/p in the canvas, Resize at 30 percent - Smart Size.
Place it in the left corner.

Open: SNP-tethys-elements36. c/p in the canvas, Resize at 40 percent - Smart Size.
Place it in the left side.

Open: SNP-tethys-elements38. c/p in the canvas, Resize at 30 percent - Smart Size.
Place it in the left bottom corner. Duplicate and place it more to the center.

Open: SNP-tethys-elements10. c/p in the canvas, Resize at 30 percent - Smart Size.
Place it in the left bottom corner, below the candle.

Open: SNP-tethys-elements22. c/p in the canvas, Resize at 25 percent - Smart Size.
Place it in the bottom and almost in the center.

Open: SNP-tethys-elements01. c/p in the canvas, Resize at 30 percent - Smart Size.
Place it in the bottom left. Image - Free Rotate: 90 degress - right.

Open: SNP-tethys-elements01. c/p in the canvas, Resize at 30 percent - Smart Size.
Place it in the bottom left. Image - Free Rotate: 90 degress - right.

Open:  SNP-tethys-elements37. c/p in the canvas, Resize at 70 percent - Smart Size.
Place it in the top right.

Open the tube, c/p in the canvas, resize if it's needed. Place it in the Right side.

Open: SNP-tethys-elements46. c/p in the canvas, Resize at 30 percent - Smart Size.
Place it in the right side, behind the tube.

Open: SNP-tethys-elements09. c/p in the canvas, Resize at 35 percent - Smart Size.
Place it in the bottom right.

Open: SNP-tethys-elements11. c/p in the canvas, Resize at 30 percent - Smart Size.
Place it in the bottom right.

Open: SNP-tethys-elements43. c/p in the canvas, Resize at 45 percent - Smart Size.
Place it in center.

Add more elements to decorate:
SNP-tethys-elements04
SNP-tethys-elements24
SNP-tethys-elements33
SNP-tethys-elements34
SNP-tethys-elements40
SNP-tethys-elements44

Sharpen the elements.

Add copyright and your name. 

To animate:
Merge the paper with the close up, Copy.
Open animation shop, paste and duplicate until you have the same quantity of frame as the animation.

Open: Shimmering stars. Cull the animation if you like it, I cull mine to: 21 frames.
Activate the first frame, select all and drag the animation to the top right of the canvas, 
place it and back to psp. close the merged background. Copy merged the rest of the layers.
Back to animation shop, paste as a new animation, duplicate until you have 21 frames.
Select all the frames and drag into your banner and place it above to finish your animation
Play the animation, save if you like it!

viernes, 16 de noviembre de 2012

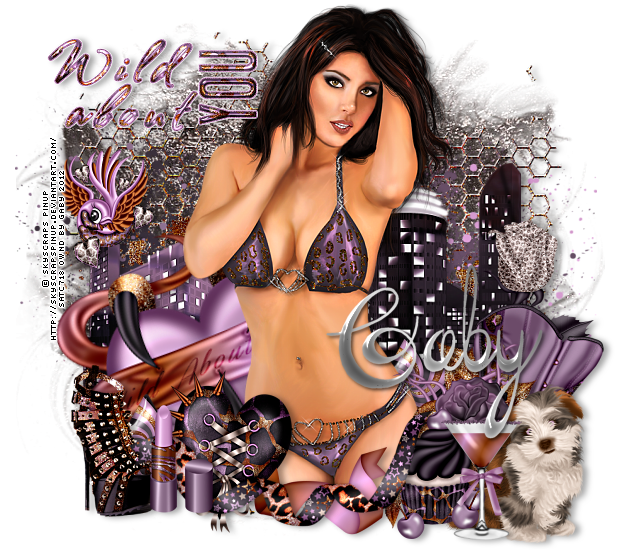
Wild about you


Supplies Needed:
Psp
Tube of choice. Art by SkyScraps, purschase it here
Scrap kit (PTU) Wild about you by Inzpired Creationz here
Mask 131 by Gems here
Eyecandy 4000
Font here


Open a new image: 620x550

Open paper: 12. C/p in the canvas.
Layers - Load Masks:

gemsmasks-131.

Resize at 95 percent - Smart Size.

Open: Chicken Wire 2. c/p in the canvas. Resize at 80 percent - smart size.
Place it in the center.

Open: Splatter 1. c/p in the canvas,  Resize at 70 percent - smart size.
Place it in the right middle side. 

Open: Splatter 2. c/p in the canvas,  Resize at 65 percent - smart size.
Place it in the left middle side. 

Open: City. c/p in the canvas,  Resize at 80 percent - smart size.
Place it in the center. 

Open: Rose 3. c/p in the canvas,  Resize at 50 percent - smart size.
Place it in the right side. 

Open: Heart 1. c/p in the canvas,  Resize at 70 percent - smart size.
Place it in the left side. Image - Free Rotate: 20 degrees - Left.

Open the tube. C/p in the canvas, resize and place it in the center. 
Effects - Plugins - Eyecandy 4000 - ShadowLab:

Open: Shoe 3. c/p in the canvas,  Resize at 40 percent - smart size.
Place it in the left side.

Open: Heart 2. c/p in the canvas,  Resize at 40 percent - smart size.
Place it next to the shoe.

Open: Lipstick. c/p in the canvas,  Resize at 30 percent - smart size.
Place it between the heart and shoe.

Open: Ribbon 2. c/p in the canvas, resize at 50 percent - smart size.
Place it in the bottom center. Image - Free Rotate: 15 degrees - Left.

Open: Ribbon 3. c/p in the canvas, resize at 40 percent - smart size.
Place it below the ribbon.

Open: Wordart 2. c/p in the canvas, resize at 40 percent - smart size.
Place it in the top left.

Open: Cupcake 3. c/p in the canvas, Resize at 35 percent - smart size.
Place it in the right side. 

Open: Puppy. c/p in the canvas, Resize at 40 percent - smart size.
Place it in the right side.

Add more elements to decorate the tag:
Cocktail 1
Corset
Flower 3
Star 3

Always: Resize, sharpen and place as desire. 
Effects - Plugins - Eyecandy 4000 - ShadowLab:

Add copyright and your name. Merge Visible, copy and paste as new image. Export as a png or jpg.

jueves, 15 de noviembre de 2012

Early Present


Supplies Needed:
Psp and Animation Shop
Tube of choice. Art by Shawli. Purchase the tube: here
Forum set 017 by me PSP PSD here or here or here
JC PSD Texture (I received from a yahoo group, many years ago) here or here or here
Animtion 78 by Simone here
Plugin:
Artistic: Sponge & Rough Pastels
Penta .com - Jeans
Xero Plugin here
Xenofex 2
Font here


Open the template. Duplicate and close the original file.
Delete the layer: Credits.

make a gradient with two colors: 
foreground: #fb0007
background : #ff64a6
angle: 30
repeats 1

invert: unchecked.

Floodfill the canvas.
Effects - Plugins - Artistic - Sponge: 

Effects - Plugins - Artistic - Rough Pastels:

click in load texture and choose one of the texture I've supplied:

For the banner, i've used: JC_002.

Activate the layer: wording
In the layer palette change the opacity to: 80.

Activate the layer: ovals
Selections - All  - Float - Defloat. Delete the original layer.
Add a new layer and flood fill with the color: #ff64a6

Effects - Plugins - Penta .com - Jeans:

Open the close up of the tube, c/p in both ovals. 
Selections - Invert. Remove the excess. Deslect.

In the layer palette, change the blend mode to: Luminance (l).
change the opacity to: 80.

Effects - Plugins - Xero - Porcelain:

Activate the layer: oval frames
Selections - All  - Float - Defloat. Delete the original layer.
Add a new layer and flood fill with the color: #fb0007

Activate the layer: words
Selections - All  - Float - Defloat. Delete the original layer.
Add a new layer and flood fill with the gradient with this settings:

Style: sunburst
Repeats: 4
Invert: checked

Deselect.

Effects - Texture Effects - Blinds:

Add drop shadow:
V: 3 H: 1
O: 35 B: 6

Open the tube. C/p in the canvas, resize if it's needed.
Place it in the center.

Add drop shadow:
V: 0 H: 3
O: 40 B: 8

Add the copyright info and your name.

To animate:

Activa the oval frames layer.

Effects - Plugins - Xenofex 2 - Constellation:

Copy merged. Open Animation shop.
Paste as a new animation. Back to psp, undo the effect and apply again
but hit the random seed button. Copy merged, in animation shop. paste after current frame.
Repeat one more time.

Select all the frames. Copy, click in the last one, paste after current frame.
Repeats until you have 27 frames and delete the last one.

Open the animation: SimoneAni78-TheBlingSeries-008.
Select all the frames, drag into your banner place it at the bottom.

Back to the animation. Edit - Undo. Animation - Flip.
Drag it again to your banner and place it in the top.

Play the animation, if you like it, save!
You're done :D