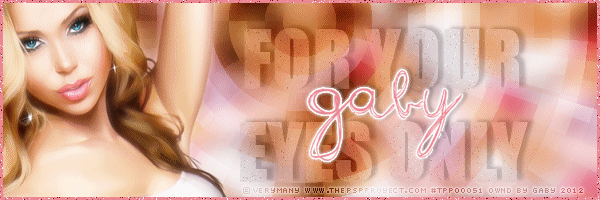
martes, 31 de julio de 2012

For your eyes only


Supplies Needed:
Psp
Tube of choice. Art by Verymany PP from The PSP Proyect. Find it: here
Plugin: Sector Mosaic (Pixelate)
Font here


Open a new image: 600x200

Open the tube, c/p in the canvas, resize at 50 percent.
effects - Plugins - Muras Meister Copies:

Duplicate. Image - Mirror. Merge down.
Adjust - Blur - Gaussian Blur:
Radius: 10

Rename it:  Background.

Add the wordart:
With the font impact I wrote:
FOR YOUR
EYES ONLY

All in caps. Color: #c0c0c0.
Adjust - Add/Remove Noise - Add Noise:
Random
5 percent
Monochrome


Apply shadow:
V: -2 H: 6
O: 60 B: 5

In the layer palette change the blend mode to: 
Luminance and change th opacity to: 35.

Open the tube. c/p in the canvas, resize if needed. Place it in the left of the banner.
Duplicate, apply gaussian blur: radius by: 3 pixels.
In the layer palette, change the blend mode to: Screen. Low the opacity to: 85.
Add your name and copyright.

Activate the layer background, duplicate two times. Hide them
Activate the first duplicated layer.
Effects - Plugins - Pixelate - Sector Mosaic:

In the layer palette, change the blend mode to: Soft light.
Merge down and rename it: New background.

Open the second duplicate.
Effects - Plugins - Pixelate - Sector Mosaic:

but change the theta tiles size to: 10
In the layer palette, change the blend mode to: Soft light.

Copy merged. Open animation shop, paste as a new animation,

Back to psp, undo until you have the duplicate layer intact, apply the effect again
but change the theta tiles size to: 15
In the layer palette, change the blend mode to: Soft light.

Copy merged. Open animation shop, paste after current frame,
back to psp and repeat the process but the change the size of tiles to:
20
25
30

In animation shop you have 5 frames. Select the first 4 frames.
Copy, activate the last frame (number 5) paste after current frame.
All this frames are selected. 
Go to: Animation - Reverse Frames.
Play the animation. If you like save and you're done.

lunes, 30 de julio de 2012

Playful Kitten


Supplies Needed:
Psp
Tube of choice. Art by Charlotte Thompson. Purchase it: here
Forum set template 011 by me: PSP here PSD here **new link here
Plugin: Cross Shadow (Graphics Plus)
Xero: Porcelain here
Font here


Open the template.Duplicate and close the original.
Don't change the background color yet, colorize later :)
Activate the layer: background

Effects - Texture Effects - Blinds:

Effects - Texture Effects - Wave:

Apply the effect again but change the settings from width to: 2
Of course feel free to play with the settings (;

Duplicate the layer.
Effects - Artistic Effects - Halftone:

Make a selection around:

Selections - Invert. Edit - Clear. Deselect.

Rename it: Animated area 1

Activate the layer: wordart
Add drop shadow:
V: 0 H: 2
O: 55 B: 3

Add a few sparkles, if you want.

Open the tube, c/p in the canvas.
Place it in the right side of the banner.
With the selection tool (feather none) make a selection:
Edit - Cleat. Deselect.

Add drop shadow:
V: -2 H: 3
O: 60 B: 4

Add your name and copyright. Export as jpg or png, for a non animate banner.

To animate:

Activate the layer: Animated area 1

Duplicate 2 more times, rename:
Animated area 1
Animated area 2
Animated area 3

Select the first layer.
With the selection tool:

make a selection around the most dark section:

Otherwise the effect is going to apply in part of the background.

With the selection:

Plguin applied without a selection:

Effects - Plugins - Graphics Plus - Cross Shadow:

activate the layer: Animated area 2

Apply the plugin but change:
Vertical: 80

Activate the last layer: Animated area 3.
Apply the plugin but change:
Vertical: 35

Close the layers: Animated area 2 and 3.

Open the first layers to animate:

Animated area 1
Frame blinkie 1
Inner Frame Blinkie 1

Copy Merged. Open Animation Shop.

Paste as a new image.

Back to psp, close the layers:

Animated area 1
Frame blinkie 1
Inner Frame Blinkie 1

and open:

Animated area 2
Frame blinkie 2
Inner Frame Blinkie 2

Copy merged. Go to Animation Shop, paste after current frame.

Back to psp, close the layers:

Animated area 2
Frame blinkie 2
Inner Frame Blinkie 2

and open:

Animated area 3
Frame blinkie 3
Inner Frame Blinkie 3


Copy merged. Go to Animation Shop, paste after current frame.
Change the speed to: 15.

Play the animation and save if you like it

**Another tip: I applied Xero - Porcelain, to the merged layer before pasted in animation shop.
My settings:

One more thing :)
You can recolor in an easy way the blinkie if you make a color banner

domingo, 29 de julio de 2012

From the tropical shore


Supplies Needed:
Psp
Tube of choice. Art by Zlata Ma from PFD, purchase it here
Scrap kit (PTU) Fun in the sun by Kittie's Sinful Designz: here
Font here


Open a new image: 600x500.
Open: 78. c/p in the canvas, place it at the bottom.
Duplicate. Image - Mirror:

Grab the selection tool:

Make a selection in this part:

Edit - Clear. Deselect. merge down the layers.

Open the paper: 1. c/p in the canvas, move it to the bottom.

Open element: 13. c/p in the canvas. Resize at 80 percent (smart size).
Place it above the sand and in the center.

Merge down this layers.

Open the tube, c/p in the canvas .Resize if needed. Place it above the cave stones.

Open element: 55. c/p in the canvas. Place it in the center.
Select the magic wand. Click outside. 

Activate the merged background. Selections - Modify - Expand by: 3 pixels.
Selections - Invert. Edit - Clear. Deselect.
Duplicate the layer. Select the original.

Adjust - Blur - Gaussian Blur:
Radius: 8

Adjust - Add/Remove Noise - Add Noise:
Random
55 percent
Monochrome

Open element: 17. c/p in the canvas. Resize at 50 percent (smart size).
Place it in the right side of the frame.
Image - Free Rotate: 
Right - 5 degrees.

Duplicate, image - flip. 
Image - Free Rotate: 
Right - 40 degrees.

Open element: 69. c/p in the canvas. Resize at 55 percent (smart size). Twice.
Place it in the center of the flowers.

Add more elements to decorate the tag:
2
14
16
18
35
52
58
64
68
72
73
76
81

Always: Resize, sharpen and place as desire. 
Add drop shadow:
V: -3 H: 3
O: 40 B: 5

Add copyright and your name. Merge Visible, copy and paste as new image. Export as a png or jpg.

TGIF


Supplies Needed:
Psp
Tube of choice. Art by Gemini Creationz at SATC, pruchase it here
Scrap kit (PTU) Night Life by Gemini Creationz: here or with the tube here
Template 119 by Becky's Creations download it here
Font here


Open the template. Duplicate and close the original file.
Delete the layer:
info

Resize at 90 percent - Smart Size.

Start from the bottom to the top.

Activate the layer: lg. rectangle 2. (selections - All. Float. Defloat)
Open the paper: gemini_nightlife_p2. c/p in the canvas. 
Resize at 70 percent - Smart Size.
Selections - Invert. Edit - Clear. Deselect. Delete the original template layer.

Activate the layer: lg. rectangle 1. (selections - All. Float. Defloat)
Open the paper: gemini_nightlife_p10. c/p in the canvas. 
Resize at 15 percent - Smart Size. 
Selections - Invert. Edit - Clear. Deselect. Delete the original template layer.

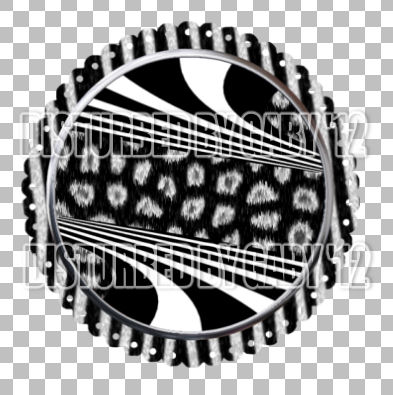
Activate the layer: lg. circle. (selections - All. Float. Defloat)
Open the paper: gemini_nightlife_p9. c/p in the canvas. 
Resize at 50 percent - Smart Size. 
Selections - Invert. Edit - Clear. Selections - Invert, again

Open the close up of the tube, c/p in the canvas, place it in the left side.
Selections - Invert. Edit - Clear. Selections - Invert, again

Paste the close up once more, select the same part or other part of the close up
and place it in the right side of the circle.
Selections - Invert. Edit - Clear. Deselect. Delete the original template layer.

In the layer palette, change the blend mode of the left side closeup to:


Activate the layer: circle text.
Colorize to black.

Activate the layer: sm. rectangle. (selections - All. Float. Defloat)
Open the paper: gemini_nightlife_p3. c/p in the canvas. 
Resize at 30 percent - Smart Size. 
Selections - Invert. Edit - Clear. Deselect. Delete the original template layer.

Activate the layer: square 2. (selections - All. Float. Defloat)
Open the paper: gemini_nightlife_p3. c/p in the canvas. 
Resize at 30 percent - Smart Size. 
Selections - Invert. Edit - Clear. Deselect. Delete the original template layer.

Activate the layer: square 1. (selections - All. Float. Defloat)
Open the paper: gemini_nightlife_p4. c/p in the canvas. 
Resize at 30 percent - Smart Size. 
Selections - Invert. Edit - Clear. Deselect. Delete the original template layer.

Activate the layer: vertical rectangle. (selections - All. Float. Defloat)
Open the paper: gemini_nightlife_p1. c/p in the canvas. 
Resize at 40 percent - Smart Size. 
Selections - Invert. Edit - Clear. Deselect. Delete the original template layer.

Activate the layer: tgif background.
Colorize to black.

Activate the layer: tgif. (selections - All. Float. Defloat)
Open the paper: gemini_nightlife_p9. c/p in the canvas. 
Resize at 40 percent - Smart Size. 
Selections - Invert. Edit - Clear. Deselect. Delete the original template layer.
Effects - 3d Effects - Inner Bevel:


Open the tube, c/p in the canvas an place it in the center of the template, above the rectangles.
Add drop shadow:
V: -1 H: 6
O: 55 B: 7

Open: gemini_nightlife_halftone. c/p in the canvas, Resize at 50 percent - Smart Size.
Sent to the bottom. Place it in the left side of the canvas. Duplicate. Image - Mirror.
Duplicate once more and move it to the center. Merge all the halftone layers.

Open: gemini_nightlife_bannerflags. c/p in the canvas, resize until is needed, place it above
the circle.

Open: gemini_nightlife_bow. c/p in the canvas, resize and place it in the right top corner.

Open: gemini_nightlife_pillow.c/p in the canvas, resize and place it at the bottom left of the tube.

Open: gemini_nightlife_stringhears. c/p in the canvas, resize and move it to the left side.

Open: gemini_nightlife_scatters. c/p in the canvas, resize, place it at the bottom, move the layer below the tube.

Add more elements the tag:
armina_fabric_flowers6b
gemini_nightlife_checkribbons
gemini_nightlife_cupcake
gemini_nightlife_flower4
gemini_nightlife_glassbuttonlips
gemini_nightlife_leapardbutterfly
gemini_nightlife_nailpolish1
gemini_nightlife_nailpolish2
gemini_nightlife_pdaphone
gemini_nightlife_record
gemini_nightlife_sequinspill
gemini_nightlife_spottedheart
gemini_nightlife_strippedheart

Always: Resize, sharpen and place as desire. 
Add drop shadow:
V: 0 H: 2
O: 50 B: 5

Add copyright and your name. Merge Visible, copy and paste as new image. Export as a png or jpg.

It's the night life


Supplies Needed:
Psp
Tube of choice. Art by Gemini Creationz at SATC, pruchase it here
Scrap kit (PTU) Night Life by Gemini Creationz: here or with the tube here
Font here

Open a new image: 650x500

Open: gemini_nightlife_frame1. c/p in the canvas, resize at 70 percent - Smart size.
Click inside, selections - modify - expand by: 5 pixels.

Open: gemini_nightlife_p2. c/p in the canvas, selections  - invert. remove the excess.
Do not deselect and invert the selection.

Open: gemini_nightlife_path.c/p in the canvas, resize at 70 percent - Smart size.
Place it at the bottom of the frame. Duplicate. Image - Flip. 
Arrange if it's needed. Merge down this layers. Remove the excess.

Open: gemini_nightlife_textpath. c/p in the canvas, resize at 70 percent - Smart size.
Place it above the frame. 

Open: gemini_nightlife_cots (dots). c/p in the canvas, resize at 50 percent - Smart size.
Place it in the right bottom corner, duplicate. Image - Flip. Duplicate. Image - Mirror.

Open the tube, c/p in the canvas, place it in the right side of the frame.
DDuplicate, apply gaussian blur: Radius: 3 
In the layer palette change the blend mode to: Overlay. Opacity: 70.

Add drop shadow:
V: 2 H: 4
O: 50 B: 5

Open: gemini_nightlife_flowerspray. c/p in the canvas, resize at 70 percent - Smart size.
Place it at the bottom of the frame. Behind the tube layer.

Open: gemini_nightlife_palm2. c/p in the canvas, resize at 50 percent - Smart size.
place it next to the right part of the frame and behind the tube.

Open: gemini_nightlife_palm1. c/p in the canvas, resize at 50 percent - Smart size.
place it next and down to the first palm.

Add more elements the tag:
gemini_nightlife_beer
gemini_nightlife_brokernheart
gemini_nightlife_fandangle
gemini_nightlife_ruffledribbon

Always: Resize, sharpen and place as desire. 
Add drop shadow:
V: 0 H: 3
O: 30 B: 5

Add copyright and your name. Merge Visible, copy and paste as new image. Export as a png or jpg.

jueves, 26 de julio de 2012

Pearls of Lust


Supplies Needed:
Psp
Tube of choice. Art by Akkasshaa only at SATC, pruchase it here
Scrap kit (PTU) Blood Thirsty by Inzpired Creationz: here
MuRa’s Meister Copies 
Font here


Open a new image: 650x600
Open: window. c/p in the canvas. Place it in the center.

Open: metal 3. c/p in the canvas, resize at 90 percent (smart size).
Place it in the center of the windows.

Open: rose 2. c/p in the canvas, resize at 50 percent (smart size). Twice.
Move it to the center.
Effects - Plugins - Muras Meister:

This settings are for this size of rose and for the windows.
Arrange the layer above the windows and below the metal.

Open: Web 1. c/p in the canvas, resize at 50 percent (smart size).
Move it to a corner:

Duplicate. Image - Mirror. Image - Flip.

Open the tube, c/p in the canvas, resize if is needed.
Place it in the center. 
Add drop shadow:
V: 0 H: 5
O: 45 B: 7

Open: Metal 2. resize at 40 percent (smart size).
Place it in the left bottom corner, behind the tube layer.

Open: Sparkles 3. c/p in the canvas.
Remove the excess outside of the borders.

Add copyright and your name. Merge Visible, copy and paste as new image. Export as a png or jpg.

Love is calling


Supplies Needed:
Psp
Tube of choice. Art by Akkasshaa only at SATC, pruchase it here
Scrap kit (PTU) Dazzling by Bibis Collection: here
Wordart 006 by me in PSP and PSD here
Font here


Open a new image: 650x550.

Open: BIBI DAZZLING ELEMENTS (9). c/p in the canvas, Place it in the center.
Open: BIBI DAZZLING ELEMENTS (81). c/p in the canvas, resize at 50 percent (smart size)
Place it at the bottom of the netting.

Open: BIBI DAZZLING ELEMENTS (89). c/p in the canvas, place it to the bottom of the flowers.
Duplicate. Image - Mirror. Arrange it with the tube placed.

Open the tube, c/p in the canvas and resize if needed.
Place it to the left.
Add drop shadow:
V: 0 H: 3
O: 55 B: 5

Open: BIBI DAZZLING ELEMENTS (1). c/p in the canvas, resize at 50 percent (smart size).
Move the layer below the tube and place it to the right side.

Open: BIBI DAZZLING ELEMENTS (78). c/p in the canvas, resize at 50 percent (smart size).
Place it next to the tube.

Open: BIBI DAZZLING ELEMENTS (86). c/p in the canvas, resize until it fits behind the hearts.
Duplicate (or copy and paste as a new selection) place it behind the hearts of your choice. 

Open the wordart, add drop shadow of your choice. C/p in the canvas.
Resize at 48 - 50 percent (smart size).
**Optional: select a heart from: BIBI DAZZLING ELEMENTS (89). Make a selection around, copy
and paste as a new layer, move the layer below the wordart and place the heart behind de O of LOVE.

Add more elements to decorate the tag:
BIBI DAZZLING ELEMENTS (1)
BIBI DAZZLING ELEMENTS (62)
BIBI DAZZLING ELEMENTS (5)

Always: Resize, sharpen and place as desire. 
Add drop shadow:
V: -1 H: 2
O: 40 B: 4

Add copyright and your name. Merge Visible, copy and paste as new image. Export as a png or jpg.

lunes, 23 de julio de 2012

Memories are forever


Supplies Needed:
Psp
Tube of choice. Art by Misticheskaya for SATC, pruchase it here
Scrap kit (PTU) Breathe Me  by Tasha's Playground: here
Font here


Open a new image: 650x500.
Open the flowers, c/p in the canvas:
flower
flower2
flower3
flowers2

Place them:

Open: flowers. c/p in the canvas, resize to 50 percent (smart size).
Duplicate two more time and arrange it:

Add drop shadow:
V: 4 H: 4
O: 45 B: 5

I apply the shadow to each flower, then merge visible, add more flowers if you need.

Open the tube. c/p in the canvas, resize if needed. Place it in the center of the flowers.
Add drop shadow:
V: 0 H: 5
O: 55 B: 5

Open: frame2. c/p in the canvas, resize to 40 percent (smart size).
Place it to the left side of the canvas:

With the magic wand click inside. Selections - Modify - Expand by: 5 pixels.
Open: paper12. c/p in the canvas, resize to 50 percent (smart size).
Move the layer below the frame. Selections - Invert. Edit - Clear.
Selections - Invert.

Open the closeup of the tube, c/p in the canvas.
Place the part you like in the frame. 
Selections - Invert. Edit - Clear. Deselect.
In the layer palette, change the blend mode to: Overlay

Open: rock. c/p in the canvas, resize to 50 percent (smart size).
Move it to the left side of the frame, duplicate and place it in the right side.

Open: flower5. c/p in the canvas, place it between the rock and the frame,
in the right side.

Open: flower band. c/p in the canvas, resize to 30 percent (smart size).
Image - Mirror. Place it in the front of the left rock

Open: cat. c/p in the canvas, resize to 70 percent (smart size).
Place it in front of the frame.

Open: journal. c/p in the canvas, resize to 50 percent (smart size).
Place it next to the rock in the right side.

Open: candle. c/p in the canvas, resize to 55 percent (smart size).
Place it in the right side, next to the journal.

Add more elements to decorate the tag:
Bird
flower4
hearts
petals
sparkles2
tutu

Always: Resize, sharpen and place as desire. 

Add drop shadow:
V: 0 H: 5
O: 50 B: 3

Add copyright and your name. Merge Visible, copy and paste as new image. Export as a png or jpg.

Funky Swirls


Supplies Needed:
Psp
Tube of choice. Art by Check 75, pruchase it here
Scrap kit (PTU) Emo Funk by Ditzy Designs: here
Font here


Open a new image: 600x500.

Open: Swirl 4. c/p in the canvas, resize 50 percent (smart size).
Place it at the right side. 

Open: Swirl 3. c/p in the canvas, resize 50 percent (smart size).
Image - Mirror. Place it in the left side.
Merge down.

Open: Swirl 2. c/p in the canvas, resize 40 percent (smart size).
Place it next to the big swirl.

Open: Swirl 1. c/p in the canvas, resize 40 percent (smart size).
Image - Mirror. Place it next to the big swirl.
Merge down this layers:

*Optional: with the freehand selection tool:

 remove small parts of the swirls:

To this:

Open: skull wings 2. c/p in the canvas, resize 40 percent (smart size).
Place it in the center, to cover the wings union.

Open: sad teddy 3. c/p in the canvas, resize 60 percent (smart size). twice.
Place it in the right side of the canvas.

Open: roses, c/p in the canvas, resize 40 percent (smart size).
Place it in the right side, behind the teddy layer.

Open the tube or closeup, c/p in the canvas, resize if needed.
Send to the bottom.
Add drop shadow:
V: -1 H: 3
O: 40 B: 6

Add more elements to decorate the tag:
Devilish Heart 2
Ribbon 1
Sparkle Hearts 1
Sparkle Hearts 3

Always: Resize, sharpen and place as desire. 
Add drop shadow:
V: 2 H: 3
O: 15 B: 5

Add copyright and your name. Merge Visible, copy and paste as new image. Export as a png or jpg.

domingo, 22 de julio de 2012

Pool Party


Supplies Needed:
Psp (I have used X3)
Tube of choice. Art by Jose Cano, pruchase it here
Scrap kit (PTU) Grillin Girlfriends by Jackies Jewels (part of a collab): here
Font here


Open a new image: 650x600
Open: pool. c/p in the canvas, resize at 85 percent (smart size).
Place it at the bottom.

Open the tube. I'm using a half tube, c/p in the canvas and resize if needed.
Place it above the pool. 
Activate the selection tool:

Make a selection here:
hit Delete key (in your keyboard) or Edit - Clear, twice.

Open: ball2. c/p in the canvas, resize 45 percent (smart size).
place it above the pool, and with the selection tool (same settings used)
remove a small part of the bottom.

Open: grass. c/p in the canvas, duplicate several times to cover the bottom part of image.
Merge down all theses layers, with the lasso tool:

make a irregular selection around the grass to remove the edges.

Open: innertube2. c/p in the canvas, resize 35 percent (smart size).
Place it above the grass next to the water slide.

Open: beer. c/p in the canvas, resize 40 percent (smart size). 
Place it above the grass in the right side. Duplicate. resize 90 percent (smart size). 
Move it a little to the front.

Add more elements the tag:
cloud
hamburguer
pinwheel1
pinwheel2
tree
umbrella
wordart

Always: Resize, sharpen and place as desire. 
Add drop shadow:
V: 0 H: 2
O: 40 B: 5

Add copyright and your name. Merge Visible, copy and paste as new image. Export as a png or jpg.