

Supplies Needed:
Psp & Animation Shop
Tube of choice. Art by SkyScraps from the store collab purchase it here
Scrap kit Christmas in the city by Bibis Collection part of a store collab free with a $10 purchase here
Plugins:
Eye candy 4000
Animation by Missy here
Font here
Open a new image: 600x200.
Selections - Select All.
Open: BIBI XMAS IN THE CITY PAPERS (5). C/p in the canvas, selections - invert. Deselect
Open: BIBI XMAS IN THE CITY ELEMENTS (55). Place it in the bottom center.
Open: BIBI XMAS IN THE CITY ELEMENTS (24).C/p in the canvas, resize at 60 percent - Smart Size.
Duplicate. Image - Mirror.
Open a tube, c/p in the canvas. Resize if it's needed. Place it in the left side.
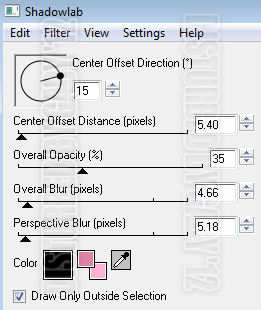
Effects - Plugins - Eyecandy 4000 - Shadowlab:

Open: BIBI XMAS IN THE CITY ELEMENTS (35). C/p in the canvas, resize at 45 percent - Smart Size.
Place it above the right side tree, Duplicate once more, resize at 90 percent.
Place it above the tree.
Open: BIBI XMAS IN THE CITY ELEMENTS (27). C/p in the canvas, place it at the bottom center.
Duplicate and move it to the left side, above the tube.
Open: BIBI XMAS IN THE CITY ELEMENTS (49).C/p in the canvas, place it at the bottom right.
Duplicate and move it to the center.
Open: BIBI XMAS IN THE CITY ELEMENTS (3). C/p in the canvas, resize at 30 percent - Smart Size.
place it at the bottom center. Duplicate and move it to the left side, above the tube.
Open: BIBI XMAS IN THE CITY ELEMENTS (1). .C/p in the canvas, resize at 40 percent - Smart Size.
place it at the bottom right. Duplicate and move it to the left.
Open: BIBI XMAS IN THE CITY ELEMENTS (25). C/p in the canvas, resize at 30 percent - Smart Size.
place it at the bottom right behind the flower
Open: BIBI XMAS IN THE CITY ELEMENTS (30). C/p in the canvas, resize at 50 percent - Smart Size.
place it at the bottom right corner, above the tree.
Open: BIBI XMAS IN THE CITY ELEMENTS (23). C/p in the canvas, resize at 40 percent - Smart Size.
place it at the bottom right corner.
Open: BIBI XMAS IN THE CITY ELEMENTS (29). C/p in the canvas, resize at 40 percent - Smart Size.
place it at the bottom right.
Open: BIBI XMAS IN THE CITY ELEMENTS (56). C/p in the canvas, resize at 40 percent - Smart Size.
place it at the bottom right, near the flower.
Open: BIBI XMAS IN THE CITY ELEMENTS (31).C/p in the canvas, resize at 30 percent - Smart Size.
place it at the bottom center, above the piano keys.
Open: BIBI XMAS IN THE CITY ELEMENTS (50). C/p in the canvas, resize at 25 percent - Smart Size.
place it at the bottom right corner.
Open: BIBI XMAS IN THE CITY ELEMENTS (28). C/p in the canvas, resize at 30 percent - Smart Size.
place it at the bottom right corner.
Open: BIBI XMAS IN THE CITY ELEMENTS (34). C/p in the canvas, resize at 30 percent - Smart Size.
place it at the bottom right corner.
Open: BIBI XMAS IN THE CITY ELEMENTS (46). C/p in the canvas, resize at 30 percent - Smart Size.
place it at the bottom right.
Open: BIBI XMAS IN THE CITY ELEMENTS (15). C/p in the canvas, resize at 30 percent - Smart Size.
place it at the bottom right.
Sharpen the elements and add shadow.
Effects - Plugins - Eyecandy 4000 - Shadowlab:

Add your name, copyright and a frame. I did mine with the paper: BIBI XMAS IN THE CITY PAPERS (4).
To animate.
Merge down the city element with the paper. Copy merged.
Open animation shop. Paste as a new animation. Duplicate until you have 20 frames.
Open: Missy_hearts3. Select the first frame and drag it to the banner.
Place it first in the left side and again in the middle right.
Back to psp. Close the merged background. Copy merged the rest of the open layers.
Duplicate until you have 20 frames. Activate the first frame and select all.
Drag to the banner and place it to make the corners match.
Play the animation if you like save :)