

Supplies Needed:
Psp & Animation Shop
Tube of choice. Art by Chiichanny purchase it here
Scrap kit Suck My Kiss (FTU) by Pimp'd Desingz here
Plugins:
Freeware Filters - Needles & Pins (or the one from VM Experimental)
Eye Candy 4000
Font here
Open a new image: 620x500 pixels.
make a gradient with two colors:
foreground: #df81a8
background : #ffb2d2
angle: 0
repeats: 2
Unchecked
Open: pd-frame-05. C/p in the canvas.
With the magic wand click inside of the frame. Selections - Modify - Expand by: 7 pixels.
Add a new layer, flood fill with the gradient. Move the layer below the frame.
Selections - Modify - Contract: 40 pixels.
Open: pd-pp-03. c/p in the canvas, place it. Selections - Invert. Edit - Clear.
Selections - Invert.
Open the close up of the tube, c/p in the canvas, place it above the square.
Selections - Invert. Edit - Clear. Selections - Invert, again.
In the layer palette change the blend mode to: Luminance.
Open: pd-pp-08. c/p in the canvas, place it. Selections - Invert. Edit - Clear.
Selections - Invert. Selections - Modify - Contract: 5 pixels.
Duplicate this mini frame, activate the orignal layer.
Adjust - Blur - Gaussian Blur:
Radius: 2 pixels. Merge with the copy.
Open: pd-print-02. C/p in the canvas, Resize at 50 percent - Smart Size.
Place it inside the frame at the bottom.
Open the main tube, c/p in the canvas, resize if it's needed.
Place it in the right side of the frame.
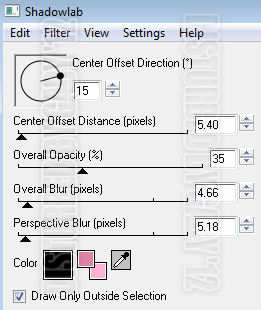
Effects - Plugins - Eyecandy 4000 - Shadowlab:
make a gradient with two colors:
foreground: #df81a8
background : #ffb2d2
angle: 0
repeats: 2
Unchecked
Open: pd-frame-05. C/p in the canvas.
With the magic wand click inside of the frame. Selections - Modify - Expand by: 7 pixels.
Add a new layer, flood fill with the gradient. Move the layer below the frame.
Selections - Modify - Contract: 40 pixels.
Open: pd-pp-03. c/p in the canvas, place it. Selections - Invert. Edit - Clear.
Selections - Invert.
Open the close up of the tube, c/p in the canvas, place it above the square.
Selections - Invert. Edit - Clear. Selections - Invert, again.
In the layer palette change the blend mode to: Luminance.
Open: pd-pp-08. c/p in the canvas, place it. Selections - Invert. Edit - Clear.
Selections - Invert. Selections - Modify - Contract: 5 pixels.
Duplicate this mini frame, activate the orignal layer.
Adjust - Blur - Gaussian Blur:
Radius: 2 pixels. Merge with the copy.
Open: pd-print-02. C/p in the canvas, Resize at 50 percent - Smart Size.
Place it inside the frame at the bottom.
Open the main tube, c/p in the canvas, resize if it's needed.
Place it in the right side of the frame.
Effects - Plugins - Eyecandy 4000 - Shadowlab:

Open: pd-heart-04. C/p in the canvas, Resize at 50 percent - Smart Size.
Place it at the bottom of the frame.
Open: pd-string-01. C/p in the canvas, Resize at 50 percent - Smart Size.
Place it at the bottom of the frame, above the hearts.
Open: pd-flower-02. C/p in the canvas, Resize at 35 percent - Smart Size.
Place it in the left corner of the frame.
Open: pd-flower-01. C/p in the canvas, Resize at 40 percent - Smart Size.
Place it in the left corner of the frame, above the black flower.
Open: pd-cherries. C/p in the canvas, Resize at 45 percent - Smart Size. Twice
Place it in the left corner of the frame, between the flowers.
Open: pd-kiss-01. C/p in the canvas, Resize at 25 percent - Smart Size.
Image - Free Rotate: Left - 25 degrees.
Place it in the left side, next to the glitter flower.
Open: pd-heart-02. C/p in the canvas, Resize at 40 percent - Smart Size.
Image - Free Rotate: Left - 15 degrees. Place it behind the flowers
Paste again and resize at 35 percent, place it behind the black flower.
Open: pd-print-01.C/p in the canvas, Resize at 40 percent - Smart Size. Twice
Place it in the right corner of the frame. Duplicate. Image - Mirror.
Place it in the left top corner.
Open: pd-wa-01.C/p in the canvas, Resize at 40 percent - Smart Size.
Place it at the top of the frame. Duplicate, resize at 90 percent. Place it next to the wordart.
Open: pd-diamond-sparkle. C/p in the canvas, place it above the tag and eraser the sparkles you don't want.
Open: pd-sparkle-01. C/p in the canvas, place it at the bottom of the tag.
Sharpen the elements and apply shadow.
Effects - Plugins - Eyecandy 4000 - Shadowlab:
Add your name and copyright.
To Animate:
Activate the gradient layer. Selections - All - Float - Defloat.
Duplicate 3 times. Rename the layers: 1,2 and 3. Change the blend mode of the layers to: Overlay.
Activate the layer: 1
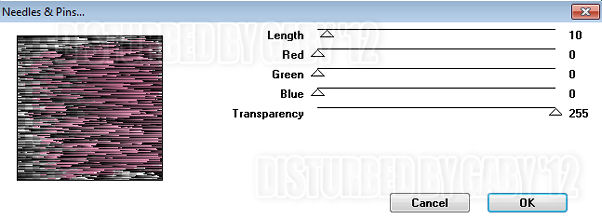
Effects - Plugins - Freeware Filters - Needles Pins:
Activate the layer: 2
Apply the filter and change the Length to: 20
Activate the layer: 3
Apply the filter and change the Length to: 15.
Deselect. Copy merged the tag (only layer 1 is open)
Open animation shop, paste as a new animation.
back to psp, close the layer: 1 and open layer: 2.
Copy merged, in animation shop: paster after current frame.
Back to psp, close the layer: 2 and open layer: 3.
Copy merged, in animation shop: paster after current frame.
Select all the frames and change the speed to 15.
Play the animation and save if you like
No hay comentarios:
Publicar un comentario