
Supplies Needed:
PSP
Tube of choice. I am using one by Sky Scraps. You can find it here
Font here
Open a new image: 600x600
Open: FS_paper3_cbj. Copy - Paste as new layer.
Layers - Load mask: gemsmask37 - Merge group.
Load the mask again.
Open - Copy - Paste your tube as new layer. Resize if need it.
Move it to the center of your tag.
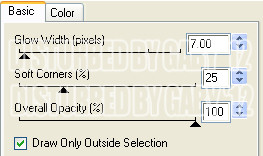
Add drop shadow:
V: 1 H: 4
O: 55 B: 8
Open: FS_leaves_cbj. Copy - Paste as new layer. Resize and arrange it below the tube.
Duplicate. Image - Mirror. Layers - Merge - Merge Down. Remember to select the duplicate before merge.
Duplicate the merge layer. Resize to: 70 or 80 percent (Smart size). Duplicate and resize again.
Open: FS_flower2_cbj. Copy - Paste as new layer. Resize. Image - Free rotate: 90 left
Arrange it between the leaves. Add all you want to decorate. I've used:
FS_chest_cbj
FS_ribbon_cbj
FS_vine_cbj
FS_bow_cbj
FS_light_cbj
FS_flower1_cbj
FS_swag_cbj
Resize smart size and apply: Sharpen.
Add drop shadow:
V: 2 H: 2
O: 50 B: 5
Open: FS_sparkles_cbj. Copy - Paste as new layer. Resize. Move the layer above the tube. Apply the mask.
Add your name and copyright. info. Merge visible. Copy, paste as new image
Save as png or jpg.
You're done with it!!
Open a new image: 600x600
Open: FS_paper3_cbj. Copy - Paste as new layer.
Layers - Load mask: gemsmask37 - Merge group.
Load the mask again.
Open - Copy - Paste your tube as new layer. Resize if need it.
Move it to the center of your tag.
Add drop shadow:
V: 1 H: 4
O: 55 B: 8
Open: FS_leaves_cbj. Copy - Paste as new layer. Resize and arrange it below the tube.
Duplicate. Image - Mirror. Layers - Merge - Merge Down. Remember to select the duplicate before merge.
Duplicate the merge layer. Resize to: 70 or 80 percent (Smart size). Duplicate and resize again.
Open: FS_flower2_cbj. Copy - Paste as new layer. Resize. Image - Free rotate: 90 left
Arrange it between the leaves. Add all you want to decorate. I've used:
FS_chest_cbj
FS_ribbon_cbj
FS_vine_cbj
FS_bow_cbj
FS_light_cbj
FS_flower1_cbj
FS_swag_cbj
Resize smart size and apply: Sharpen.
Add drop shadow:
V: 2 H: 2
O: 50 B: 5
Open: FS_sparkles_cbj. Copy - Paste as new layer. Resize. Move the layer above the tube. Apply the mask.
Add your name and copyright. info. Merge visible. Copy, paste as new image
Save as png or jpg.
You're done with it!!