Mostrando entradas con la etiqueta Xmas. Mostrar todas las entradas

martes, 18 de diciembre de 2012

Tags made by my friends with my Scrap

thanks to Isa Santander and Angela Rico for sharing with me this beautiful tags ♥
They are lovely :)


Tags made by my friends with my Scrap


thanks to Isa Santander and Angela Rico for sharing with me this beautiful tags ♥
They are lovely :)


FTU Tutorial by Deep: Happy Holidays


Want to share this fab tutorial that Deep made with my Scrap kit: Happy Holidays!
Looks amazing, check the tutorial here


Golden Holidays


Supplies Needed:
Psp and Animation Shop
Tube of Choice. Art by SkyScraps Pinup, find the tube here
Scrap kit (FTU) Happy Holidays by me here
Animated Bling created by Angelica Sellers here or here
Plugin:
Eyecandy 4000
Font here


Open a new image: 650x500

Open: DBG - HH - 062. c/p in the canvas. Resize at 70 percent - Smart Size.
Place it in the center. 
With the magic wand click inside. Selections - Modify - Expand: 10 pixels.

Open: DBG - HH - Paper04. c/p in the canvas. Resize at 70 percent - Smart Size.
Place it behind the frame. Selections - Invert. Edit - Clear. Deselect

Open: DBG - HH - 049. C/p in the canvas, place it in the top right of the frame.

Open: DBG - HH - 036. c/p in the canvas. Resize at 50 percent - Smart Size.
Place it in the top left of the frame.

Open the tube, c/p in the canvas. Resize if it's needed, place it in the center 
and remove the excess at the bottom.

Open: DBG - HH - 045. c/p in the canvas. Resize at 50 percent - Smart Size.
Place it in the bottom right corner of the frame.

Open: DBG - HH - 011. c/p in the canvas. Resize at 50 percent - Smart Size.
Place it in the bottom right side the frame, next to the bottle.

Open: DBG - HH - 044.c/p in the canvas. Resize at 40 percent - Smart Size.
Place it between the present and the bottle.

Open: DBG - HH - 047.c/p in the canvas. Resize at 42 percent - Smart Size.
Place it in the corner, behind the champagne glasses.

Open: DBG - HH - 018. c/p in the canvas. Resize at 50 percent - Smart Size.
Image - Free Rotate: Right - 40 degrees. Place it in the left bottom corner.

Duplicate. Image - Free Rotate: Left - 90 degrees. Place it in the corner.

Open: DBG - HH - 017. c/p in the canvas. Resize at 40 percent - Smart Size.
Place it above the bottom leaves.

Open: DBG - HH - 026. c/p in the canvas. Resize at 40 percent - Smart Size.
Place it in the left corner, above the decorated leaves.

Open: DBG - HH - 040. C/p in the canvas. Resize at 50 percent - Smart Size.
Image - Free Rotate: Left - 20 degrees. Place it in the left, behind the paper flower.

Open: DBG - HH - 057. C/p in the canvas. Resize at 30 percent - Smart Size.
Place it in the left corner, above the flower.

Open: DBG - HH - 052. C/p in the canvas. Resize at 30 percent - Smart Size.
Place it above the candle, in the corner.

Open: DBG - HH - 023. c/p in the canvas. Resize at 25 percent - Smart Size.
Place it in the corner, next to the clock.

Open: DBG - HH - 010. c/p in the canvas. Resize at 50 percent - Smart Size.
Place it behind the candle.

Open: DBG - HH - 025. c/p in the canvas. Resize at 30 percent - Smart Size.
Place it at the bottom above the clock.

Open: DBG - HH - 030. c/p in the canvas. Resize at 30 percent - Smart Size.
Place it at the bottom corner, next to the golden roses.

Open: DBG - HH - 070. c/p in the canvas. Resize at 70 percent - Smart Size.
Place it at the center bottom of the frame.

Effects - Plugins - Eye Candy 4000 - Shadowlab:

Same shadow for the tube and elements.

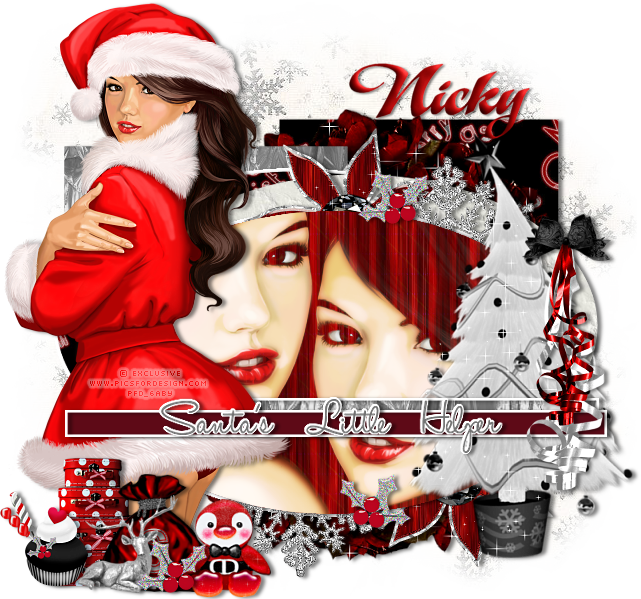
Add the name and copyright. Export as a png or jpg now to have a non animated tag.

To animate:

Copy merged the tag, duplicate until you have 5 frames.

Open: KatBling0907_35. Select the first frame, select all.
Drag the bling into the tag and place it where you like it, I did twice.


**Adding a background to the transparent animation.

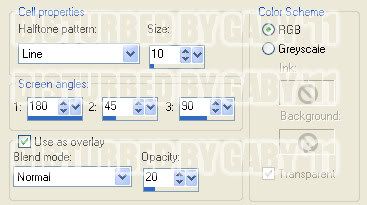
Animation - Animation Properties
Change the black color for the color of your choice, mine is white:

Apply and the color will be applied in all the frames selected.

Change the speed to: 10, play the animation and save if you like! :)


domingo, 16 de diciembre de 2012

Free Scrap kit: Happy Holidays


Well here I come with my second scrap kit created for the holiday times, the kit contains elements for Christmas and New Year.
I've tried to make something diferent in dark colors with gold, silver and black.
I hope you all like it and can created something nice!!
is tagger size :)


DOWNLOAD HERE:


martes, 13 de diciembre de 2011

Freebie Cluster n Cluster Frames

My first set of cluster and clusters frames made with the kit: Christmas Delight by Bibi's Collections You can find the kit here
thank you for looking (=
***click in the preview to see it in original size****


domingo, 11 de diciembre de 2011

Santa's lil Helper


Supplies Needed:
PSP 
Tube of choice. I am using an exclusive tube from PFD. You can find it here
Exclusive Scrap Christmas in the City (FTU) by Nicky
You need to register at SATC forum to download
Template by Leah from Gimptactic Tuts here
Mask by Vaybs from: Creative Misfits here
Xero Plugin here
Font here


Open the template, Shift + D, close the original.
Delete the layers:
credit
top dots
bottom dots
stars 1
stars 2
lrg star 1
lrg star 2

Image - Resize at 85 - Bicubic. 
Select the crop tool and apply with these settings:
width: 595
height: 515

Image - Canvas Size: 650x600
placement: center

Select the background layer and floodfill with white of delete.
Open Paper 9, Copy - Paste, as a new layer. 
Layers - Load mask: DBVMisfitmask4 - Merge group.

Activate the layer: square 2. Selections - Select All - Float - Defloat.
Open: Paper 2. copy- paste as a new layer. Resize at 70 - Smart size.
Selections - Invert. Edit - Clear. Deselect and delete the original layer.

Activate the layer: square 1. Selections - Select All - Float - Defloat.
Open: Paper 11. copy- paste as a new layer. Resize at 70 - Smart size.
Selections - Invert. Edit - Clear. Deselect and delete the original layer.

Activate the layer: oval 4. Selections - Select All - Float - Defloat.
Open: Paper 2. copy- paste as a new layer. Resize at 70 - Smart size.
Selections - Invert. Edit - Clear. Deselect and delete the original layer.

Activate the layer: oval 3. Selections - Select All - Float - Defloat.
Open: Paper 12. copy- paste as a new layer. Resize at 70 - Smart size.
Selections - Invert. Edit - Clear. Deselect and delete the original layer.

Activate the layer: oval 1. Selections - Select All - Float - Defloat.
Open: Paper 10. copy- paste as a new layer. 
Effects - Artistic Effects - Halftone:

Selections - Invert. Edit - Clear. Deselect and delete the original layer.
Open the closeup of your tube. copy- paste as a new layer. Resize if is needed.
Arrange it in the place of your choice. 
Effects - Plugins - Xero - Radiance:
Default settings. 

In the layer palette change the blend mode of the layer to: Lighten. Duplicate. Image - Mirror.
Select the oval layer. Selections - Select All - Float - Defloat. Activate the close up layer. 
Selections - Invert. Edit - Clear. Selections - Invert. select the duplicate and do the same.

Activate the layer: thin rect 2. Selections - Select All - Float - Defloat.
Open: Paper 11. copy- paste as a new layer. Resize at 70 - Smart size.
Selections - Invert. Edit - Clear.Deselect and delete the original layer.

Activate the layer: words. Adjust - Hue and Saturation - Colorize:
Hue: 0
Saturation: 0

Open the tube. Copy - Paste, as a new layer. Rezise if needed and place it.
Now add all the elements you want to finish your tag. I've used these elements:
bow 2
cupcake 5
curly ribbon 1
curly ribbon 2
deer
flower 1
holly
penguin 1
santas bag
snowflake charm 9
train cases
tree 5
wreath 1

apply drop shadow:
V: 1 H: 4
O: 50 B: 5
Add your name and copyright. Save as jpg or png.

lunes, 28 de noviembre de 2011

Santa Stop Here


Supplies Needed:
PSP 
Tube of choice. I am using one by Barbara Jensen, you can purchase the tube: here
Scrap Xmas Magic (PTU) by Bibi. You can buy it here


Mask here 
(the mask is not made by me, but i can't find the person who made it, if you know the author please let me know to give proper credit)
Font here

Open a new Image 600x600. Fill the background with white.

Open: @PAPER (4). Copy - Paste as a new layer.  
Layers - Load mask: Mask_By_Rose7 - Merge group

Open: @PAPER (1). Copy - Paste as a new layer.  
Layers - Load mask: Mask_By_Rose7 - Merge group. 

Grab your selection tool and make a rectangule like this:

Selections - Invert. Edit - Clear. Deselect.

Open garlansj green. Copy - Paste as a new layer. Resize at 70 - Smart Size.
Arrange it in the top of the mask.

Open: xmas lights 2. Copy - Paste as a new layer. Resize at 35 - Smart Size. x2
Image - Flip. Image - Mirror. Arrange above the garland.

Open: Santa stop here!. Copy - Paste as a new layer. Resize at 50 - Smart Size.
Move it to the right corner of the mask.

Open: granitos. Copy - Paste as a new layer. Resize at 50 - Smart Size. 
Image - Flip. Duplicate and place it above the lights. 

Open: TREE (2). Copy - Paste as a new layer. Resize at 50 - Smart Size. 
Move the tree to the left part of your image. Duplicate and change the blend mode to: Soft Light

Open: fireworks. Copy - Paste as a new layer. Duplicate x2 and place it above the tree.

Open: GIFT (4). Copy - Paste as a new layer. Place it to the right bottom corner of the mask.
Open: VELAS (2). Copy - Paste as a new layer. Resize at 50 - Smart Size.
Arrange it above the box in the right side.
Open: GIFT (2). Copy - Paste as a new layer. Resize at 60 - Smart Size. 
Place it above the other gift.
Open: GIFT (1). Copy - Paste as a new layer. Resize at 50 - Smart Size.
place in front of the red present.

Open the tube.  Copy - Paste as a new layer. Resize if needed and place it where you want.
Drop shadow:
V: -2 H: 5
O: 60 B: 6

Now add all the elements you want to finish your tag. I've used the following elements:
colgante 2 
BOW (3)
BOW (1)
esfera bag
esfera santa bag
GLITTER STAR
green hat
green lolis
Santa stop here FLOWER DECO
SANTAS LETTER
CANDY CANE 1
CANDY CANE 2
candle1
RAMAS
DELICIOUS CAKES (1)
DELICIOUS CAKES (2)

Open, Copy - Paste, as a new layer, Sharpen after resize these elements.
Drop shadow:
V: 2 H: 2
O: 50 B: 5

Add copyright info.
For the name: Write your name using a gold pattern in the background. 
Duplicate if you want and apply shadow to the original layer:
V: 1 H: 3
O: 45 B: 4
write your name again but with the color: #d30e21. 
move it to the left a little to show more the gold pattern
Save now as jpg or png.

jueves, 24 de noviembre de 2011

Is a Xmas Magic


Supplies Needed:
PSP 
Tube of choice. I am using one by Barbara Jensen Exclusive to SNC, you can purchase the tube: here
Scrap Xmas Magic (PTU) by Bibi. You can buy it here
Mask 212 by Gems here
Plugins:
Eyecandy 3
Eyecandy 4000


Open a new image: 650x650
Floodfill with white.
Open: @PAPER (2). Copy - Paste as a new layer. 
Layers - Load mask: gemsmasks-212 - Merge group.

Open: frame 1. Resize at 60 - Smart Size. Image - Mirror. Move it to the bottom.
Duplicate. Image - Mirror.

Close the white background and the mask layer. Merge the frames layers and unhide the layers.
Select the magic wand tool click inside of each frame (hold shift key in your keyboard).
Selections - Modify - Expand: 5.
Open: @PAPER (2). Copy - Paste as a new layer. Resize at 70 - Smart Size. 
Selections - Invert. Edit - Clear.Deselect. Move the layer below the frame.
select the frames layer, click in the bottom frame with your magic wand, expand by 5.
Open the close up of your tube. Copy - Paste as a new layer. Selections - Invert. Edit - Clear. Deselect.
Move the layer below the frame and change the blend mode to: Darken.

Open the tube. Copy - Paste as a new layer. Move it to the right side. Duplicate and 
change the blend mode to: Overlay, low the opacity to: 65.
Apply Drop Shadow to the original tube layer:
V: 0 H: 5
O: 40 B: 7

Open, Copy - Paste, as a new layer these elements from the kit:
Copos red. 
GIFT (1)
GIFT (2)
GIFT (3)
TREE (1)
BOW (4)
CANDY CANE 1. rotate 15 right. Image - Mirror.
ESFERA
esfera santa bag
X FLOWER
xmas lights 2
candy cane deco. rotate 15 right. 
garlansj green
RAMAS. rotate 90 left.
santas baggie
REINDIER. Image - Mirror.
BOW (3)
Gaby 
VELAS (1)
DELICIOUS CAKES (2)
flor pascua. rotate 30 right.

Resize at 30 or 40 two times, it depends of you ;)
Apply Drop Shadow:
V: -1 H: 2
O: 40 B: 3

For the name:
write your name with the color: #02cb00. 
Image - Rotate - Free Rotate:
left - 25 degrees.

Effects - texture effects - blinds:
width: 2
Opacity: 20
color: black
Horizontal checked

Effects - Plugins - Eyecandy 3 - Inner Bevel:

Effects - Plugins - Eyecandy 4000 - Gradient Glow:
Default settings

Apply Drop Shadow:
V: 2 H: 5
O: 35 B: 3


Add the copyright info. Merge visible. Copy, paste as new image. Save as png or jpg.
You're done with it!!