viernes, 13 de enero de 2012

Forum set Latex Love


Supplies Needed:
PSP 
Tube of choice. I am using one by Zlata M, exclusive for The PSP Proyect Store you can purchase the tube here
Animation Shop
Plugins:
Dsb flux here
Muras Meister Copies
Eye candy 4000 (Gradient glow)
Font here


Open a new image: 600x200.

Make a gradient with two colors of your choice or use a gradient alredy done.
Lynd04-059
Style: Sunburst
Repeats: 2
Invert: checked
floodfill the canvas with the gradient.

Open the tube or close up. Copy and paste as a new layer in the center. 
Go to: Effects - Plugins - Mura's Meister - Copies:


Try to get something like that and apply. 
Selections - Select All. Selections - Invert. Edit - Clear. Deselect.
In the layer palette change the blend mode to: Overlay. Duplicate.
Select the original layer. 
Go to: Effects - Plugins - Dsb flux - Blast:

Adjust - Add/Remove Noise - Add noise:

Uniform
25 percent
Monochrome

Select the top layer. And with a bold font(I've used impact) write: LATEX LOVE (all in caps) or something you like In color white.

Add drop shadow:
V: 2 H: 2
O: 40 B: 5

Edit - Copy. Edit - Paste as a new selection 3 more times. Deselect. In the layer palette, low the opacity to: 60.

Open your tube. Copy and paste as a new layer. Resize if needed. Place it in the center or were you want. 
Selections - Select all. Invert. Edit - Clear. Deselect. 
Duplicate the tube. Adjust - Blur - Blur More

In the layer palette change the blend mode to: Overlay. low the opacity to: 50.
Add a new layer. Selections - Select all. Selections - Modify - Select Selections borders.
Inside
Border width: 3
Anti-alias: unchecked

Floodfill with the gradient. Deselect. Add noise, if you want.

Adjust - Add/Remove Noise - Add noise:

Gaussian
55 percent
Monochrome

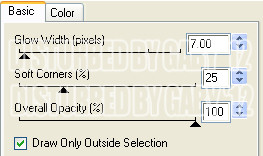
Go to: Effects - Plugins - Eye candy 4000 - gradient glow:


Add your name and the copyright info. 
If you want a non animate banner, save now as jpg or png.

To animate:

Activate the bacground layer. Go to: Effects - Plugins - Dsb flux - Bubbles:

Edit - Copy Merged. Open Animation Shop. Paste as a new animation.
Back to psp. Edit - Undo. Apply the plugin again but the setting: 
Bubbles from 13 to 16
Copy merged and Paste after current frame. Repeat the steps changing the 
bubbles to: 19, 17 y 15. 
In Animation Shop you should have 5 frames. Edit - Select All.
Animation - Frames Properties: 14
Play animation. If you like it save as gif.
You're done!


Avatar: 
Open a image 150x150.
Floodfill the canvas with the gradient we used for the banner. 
Copy and paste the tube, resize if you want. Image - mirror. Place it in the right side of the canvas.
Apply Dsb flux - Blast. Apply Noise:

Uniform
25 percent
Monochrome

change the blend mode to: Overlay. 
Write LATEX LOVE with the font Impact in color: #ffffff . Image - Free Rotate:
Left - 90.
Arrange it above the tube in the right side. Add drop shadow:
V: 2 H: 2
O: 40 B: 5

low the opacity to: 60.

Open your tube. Copy and paste as a new layer. Resize. Place it in the left side. 
Selections - Select all. Invert. Edit - Clear. Deselect. 
Duplicate the tube. Adjust - Blur - Blur More

In the layer palette change the blend mode to: Overlay. low the opacity to: 50.
Add a new layer. Selections - Select all. Selections - Modify - Select Selections borders.
Inside
Border width: 3
Anti-alias: unchecked

Floodfill with the gradient. Deselect. Add noise, if you want.

Adjust - Add/Remove Noise - Add noise:

Gaussian
55 percent
Monochrome

Apply the gradient glow used. Add your name and the copyright info. 
Animate as we did before.

Latex Love


Supplies Needed:
PSP 
Tube of choice. I am using one by Zlata M, exclusive for The PSP Proyect Store you can purchase the tube here
Mask by me here
Gradient set 4 - 059 by Lyndie here (login required)
Animation Shop
Plugins:
Dsb flux here
Muras Meister Copies
Eye candy 4000 (Gradient glow)
Font here


Open a new Image: 600x600

Select the elipse tool:
Create on Vector.
Foreground: none
Background: white.

Make a few circles in your canvas. Example:

In the layer palette: Right click to the layer with the circles and Convert to raster Layer
Adjust - Add/Remove Noise - Add noise:
Gaussian
55 percent
Monochrome

Add a new layer and floodfill with the gradient: lynd04-059 or one that match your tube.
Style: sunburst
Repeats: 2
Invert: unchecked

With the freehand selection tool make a selection around one of the circles.
Selections - Float. Selections - Defloat.
Copy and paste the closeup or the tube, Selections - Invert. Edit - Clear.
Deselect and change the blend mode to: Luminance (Legacy) and/or Screen. Your choice.
Repeat this steps in every circle.

Activate the gradient layer.
Selections - Select All.Selections - Float.Selections - Defloat.

Effects - Texture Effects - blinds:
Width: 2
Opacity: 20
Color: #202020
Horizontal: checked
Light from left/top: unchecked


Effects - Artist Effects - Halftone:

Acitvate the top layer and add a new layer. Floodfill with the gradient but Invert: checked.
In the layer palette: Change the blend mode of the layer to: Color (Legacy)

Select the text tool and a pixel font: FFF Urban with the settings:

I wrote: LATEX LOVE * all in caps. Go to: Objects - Align - Center in Canvas.

Go to: Effects - Plugins - Mura's Meister - Copies:
In the layer palette. Arrange - Send to bottom.

Add drop shadow:
V: -1 H: 1
O: 45 B: 3

Layers - Load mask: DBG_003 - Merge group.

Select the circles layers. Go to: Effects - Plugins - Eye candy 4000 - gradient glow:


Finish decorating with some stars or anything you like.
I choose the tool: Symmetric Shape tool, with the settings:

Make a few stars and apply gradient glow with the same setting used.

Copy and paste the main tube as a new layer. Arrange it in the canvas.
Add drop shadow:
V: -2 H: 4
O: 40 B: 7

Add your name and the copyright info.

Save as png or jpg.
You're done with it!!

lunes, 9 de enero de 2012

Under the tree of love


Supplies Needed:
PSP
Tube of choice. I am using one by Gorjuss. You can purchase her tubes here
Scrap All for Love (PTU) by Sam's Scraps. You can see it here
Mask 15 by Vix here
Font here


Open a new image 600x600

Open: 3LH11 - PU AFL Paper 2. Copy - Paste as a new layer.
Resize at 70 percent. Move to the bottom. 
Layers - Load mask: vix_mask15 - Merge group.
Duplicate. select the original layer. Adjust - Blur - Gaussian Blur:
Radius 4

Effects - Texture Effects - Fine Leather:

Grab your selection tool and make a selection:

Edit - Clear and deselect.

Add a new layer. Select the picture tube tool, search for grass 01. Scale: 50.
Click in your image, arrange it, duplicate. Image - mirror. Merge Visible.

Open: 3LH11 - PU AFL Tree 1. Copy - Paste as a new layer.
Resize and place it in the left side of your canvas. 

Open: 3LH11 - PU AFL Frame 2. Copy - Paste as a new layer. 
Resize at 70 percent. Place it in the right side of your canvas.

Select the magic wand tool, click inside of the frame. 
Selections - Modify - Expand: by 2 pixels

Open the tube or closeup. Copy - Paste as a new layer. Move the layer below the frame.
Selections -Invert. Edit - Clear. Deselect.
In the layer palette change the blend mode to: Burn.

Open - Copy - Paste your tube as new layer. Resize if need it.

Apply drop shadow:
V: 1 H: 3
O: 45 B: 5

To finish Add all the elements of your choice.
3LH11 - PU AFL buterfly
3LH11 - PU AFL Fabric Flower 1
3LH11 - PU AFL Fabric Flower 2
3LH11 - PU AFL Flowers 1
3LH11 - PU AFL Flowers 2
3LH11 - PU AFL Heart  charm
3LH11 - PU AFL Heart 2
3LH11 - PU AFL Ribbon 3
3LH11 - PU AFL Ribbon Embroidery
3LH11 - PU AFL Scattered Hearts
3LH11 - PU AFL Teddy 1

Apply drop shadow:
V: 1 H: 2
O: 45 B: 4

Add your name and copyright info. Merge visible. Copy, paste as new image
Save as png or jpg.
You're done with it!!

Freebie Cluster and Cluster frame: Hard Love


Made with the kit: Hard Love by  Bibi's Collections You can find the kit here
thanks for looking (=
***click in the preview to see it in original size***


sábado, 7 de enero de 2012

Amore Mio


Supplies Needed: 
PSP 
Tube of choice. I am using one by Lady Mishka. You can purchase her tubes here
Scrap Amore by  Bibi's Collections You can find the kit here
Cluster frame by me: here
Mask 8 by: Gems Taggin Scraps: here
Plugin Eyecandy 4000 glass 
Font of choice 

Open the cluster frame. Duplicate and close the original image.
Resize and crop a little if you want. Eliminate: Raster 2

Activate: Raster 3.
Selections - Select All - Float - Defloat. 
Open the paper @papers (3), Copy - Paste, as a new layer. 
Selections -Invert. Edit - Clear. Selections -Invert. 
Copy the closeup of the tube, arrange it under the left frame. 
Selections -Invert. Edit - Clear. Do the same for the right frame and Deselect. 
Adjust - Hue and Saturation - Colorize:
Hue: 0
Saturation: 0

In the layer palette change the blend mode to: Overlay. (both closeup layers)
Select the paper layer:

Adjust - Add/Remove Noise - Add Noise:
Random
1 percent
Monochrome.

Add a new layer, send to bottom. Selections - Select All.
Open the paper @papers (2), Copy - Paste into selection.
Layers - Load mask: gemsmask8 - Merge group.

Select the frame layer.
Activate the text tool, write a pharse of your choice, mine:
AMORE MIO
font: impact
Size: 72
Color: #b80201 (my choice)
Create as a vector
Objects - Align - Horz. center in canvas
Select the pick tool (letter k) and strech the text horizontally (clicking in the nodes), like this:

Convert
Move the text a little to the right side. Duplicate the layer. Select the original text layer:
Adjust - Brightness and Contrast - Brightness/Contrast:
Brightness: -125
Contrast: -50 
Activate the duplicate text layer, and move it to the left side until you like it.
Effects - Plugins - Eye candy 4000 - Glass:


Effects - Texture Effects - blinds:
Width: 3
Opacity: 27
Color: black
Horizontal: checked
Light from left/top: unchecked
Effects - Texture Effects - Mosaic Antique:
Apply shadow:
V: 0 H: 3
O: 45 B: 6
Select the original text layer and apply shadow:
V: -1 H: 4
O: 60 B: 5
Open - Copy - Paste your tube as new layer. Resize if need it. 
Move it to the center of your tag.
Apply shadow:
V: -1 H: 4
O: 30 B: 7
Now finish decoration your tag with elements from the kit. My choice:
BC Amore (6)
BC Amore (11)
BC Amore (19)
BC Amore (28)
BC Amore (29)
BC Amore (35)
BC Amore (55)
BC Amore (57)
Apply shadow:
V: 0 H: 2
O: 55 B: 4
Add your name and copyright. info. Merge visible. Copy, paste as new image
Save as png or jpg.
You're done with it!!

viernes, 6 de enero de 2012