Supplies Needed:
Psp & Animation shop
Tube of choice. Art by Sarafairy, the tube is available here
Scrap kit Eva (PTU) by A SkyScraps here
Animation 142 by Simone here
Plugins:
Xero here
Eye candy 4000
Font here
Open a new image: 650x600.
Open: mask02photoshop.png . C/p in the canvas. Image - Free Rotate: Left - 90 degrees.
Place it in the center. with the selection tool:
Make a selection around the black rectangle.
Open the close up of the tube, c/p in the canvas and place it in the right side of the rectangle.
Selections - Invert. Edit - Clear. Deselect.
In the layer palette change the blend mode to: Luminance. Opacity: 55.
Effects - Plugins - Xero - Clarity:
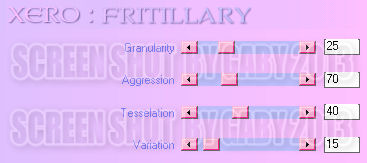
Effects - Plugins - Xero - Fritillary:
Merge visible.
Open: element44. C/p in the canvas. Resize at 70 percent - Smart Size.
Place it in the left side, next to the close up.
Open: element05. C/p in the canvas. Resize at 50 percent - Smart Size.
Place it in the top left of the mask. Duplicate. Image - Mirror.
Open: element54. C/p in the canvas. Resize at 45 percent - Smart Size. Twice
Place it in the top left, next to th rose. Duplicate. Image - Mirror.
Open: element04. C/p in the canvas. Resize at 60 percent - Smart Size.
Place it in the middle left. Move the layer below the mask. Duplicate. Image - Mirror.
Open: element19. C/p in the canvas. Resize at 65 percent - Smart Size.
Place it in the bottom center, above the mask.
Open the tube c/p in the canvas and place it above the couch.
Effects - Plugins - Eye Candy 4000 - Shadowlab:
Open: element45. C/p in the canvas. Resize at 40 percent - Smart Size.
Place it in the bottom right, next to the couch.
Open: element40. C/p in the canvas. Resize at 40 percent - Smart Size.
Place it in the bottom right, above the tombstone.
Open: element17. C/p in the canvas. Resize at 50 percent - Smart Size. Twice.
Place it in the bottom right, next to the candelabra.
Open: element18. C/p in the canvas. Resize at 45 percent - Smart Size. Twice.
Place it in the bottom left.
Open: element38. C/p in the canvas. Resize at 45 percent - Smart Size. Twice.
Place it in the bottom left, next to the violin.
Open: element59. C/p in the canvas, place it above the tube, more to the bottom.
Sharpen the elements and apply shadow.
Effects - Plugins - Eye Candy 4000 - Shadowlab:
Add the name and copyright info.
To animate:
Activate the merged mask layer with the close up. Make a rectangle around the closeup.
Copy, open animation shop and paste as a new animation.
Effects - Insert Image Effects:
Delete the first frame. Back to psp, close the layer with the mask and close up and the elements behind the mask.
Merge visible the open layers, copy merged. In animation shop: paste as a new animation.
Duplicate until you have 18 frames.
Back to psp and close the merged layer. Open the rest. Copy merged.
In animation shop: paste as a new animation. Duplicate until you have 18 frames.
Drag the animation you did and place it above the mask layer, where it belongs.
Activate the animation with the tube and elements. Place it above the tag.
Open: SimoneAni142-psd.
Activate the first frame, select all. Animation - Resize at 50 percent.
Drag the animation into the tag and place it in the left bottom side.
Undo the drag in the animation. Animation - Flip. Animation - Mirror.
Place it in the top right, above the close up.
**Adding a background to the transparent animation.
Animation - Animation Propieties
Change the black color for the color of your choice, mine is white:
Apply and the color will be applied in all the frames selected.
Change the speed to: 13, play the animation and save if you like! :)


No hay comentarios:
Publicar un comentario