Supplies Needed:
Psp & Animation shop
Scrap kit Fafa (PTU) by Tiny Turtles Designs here
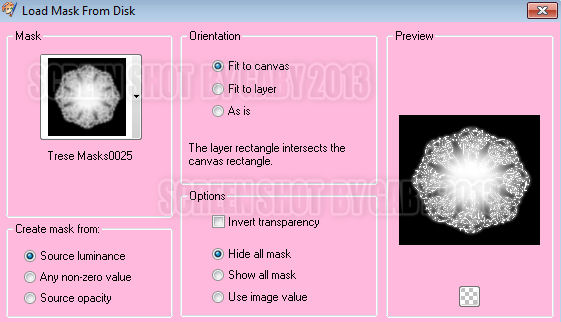
Mask 25 by Trese here
Animation 261 by Simone here
Plugins:
Eye candy 4000
Font here
Open a new image: 650x600.
Open: Fafa (23). C/p in the canvas. Layers - Load/Save Mask - Load Mask from the disk:
With the mask layer active, Resize at 110 percent - Bicubic. Merge group.
Open: Fafa (14). C/p in the canvas, resize at 65 percent - Smart Size.
Image - Flip. Place it in the top right side of the mask.
Open: Fafa (31). C/p in the canvas, resize at 45 percent - Smart Size. Twice.
Place it in the left side.
Open: Fafa (52). C/p in the canvas, resize at 55 percent - Smart Size.
Place it in the left middle side.
Open: Fafa (96). C/p in the canvas. Place it in the left side.
Open: Fafa (20). C/p in the canvas, resize at 50 percent - Smart Size. Twice.
Place it in the right side.
Open: Fafa (67). C/p in the canvas, resize at 55 percent - Smart Size. Twice.
Image - Free Rotate: Left - 90 degrees. Place it in the bottom left. Duplicate.
Image - Flip. Arrange it in the bottom right.
Open: Fafa (80). C/p in the canvas. Place it in the center.
With the magic wand click inside of the frames, expand the selection: 10 pixels.
Open: Fafa (27). C/p in the canvas, resize at 70 percent - Smart Size.
Place it below the frames. Selections - Invert. Edit - Clear. Deselect.
Open: Fafa (5). C/p in the canvas, resize at 55 percent - Smart Size. Twice.
Place it in the bottom left.
Open the tube, c/p in the canvas, resize if it's needed and place it in the center.
Effects - Plugins - Eye Candy 4000 - Shadowlab:
Open: Fafa (74). C/p in the canvas, resize at 55 percent - Smart Size. Twice.
Place it in the right side.
Open: Fafa (69). C/p in the canvas, resize at 50 percent - Smart Size.
Image - Flip. Place it in the bottom right side.
Open: Fafa (75). C/p in the canvas, resize at 50 percent - Smart Size.
Place it in the bottom right.
Open: Fafa (17). C/p in the canvas, resize at 50 percent - Smart Size. Twice.
Place it in the bottom center.
Open: Fafa (76). C/p in the canvas, resize at 50 percent - Smart Size.
Place it in the bottom left.
Open: Fafa (72). C/p in the canvas, resize at 80 percent - Smart Size.
Place it in the bottom right.
Open: Fafa (62). C/p in the canvas, resize at 40 percent - Smart Size. Twice.
Place it in the right side.
Open: Fafa (33). C/p in the canvas, resize at 55 percent - Smart Size. Twice.
Place it in the bottom center.
Open: Fafa (40). C/p in the canvas, resize at 50 percent - Smart Size. Twice.
Place it in the bottom left.
Open: Fafa (73). C/p in the canvas, resize at 75 percent - Smart Size.
Image - Mirror. Place it in the middle left.
Open: Fafa (43). C/p in the canvas, resize at 45 percent - Smart Size. Twice.
Place it in the right side.
Open: Fafa (77). C/p in the canvas, resize at 30 percent - Smart Size.
Place it in the bottom left.
Open: Fafa (68). C/p in the canvas, resize at 55 percent - Smart Size. Twice.
Place it in the bottom left.
Open: Fafa (7). C/p in the canvas, resize at 50 percent - Smart Size. Twice.
Place it in the bottom right.
Open: Fafa (14). C/p in the canvas, resize at 65 percent - Smart Size.
Image - Mirror. Place it in the left side.
Sharpen the elements and apply shadow.
Effects - Plugins - Eye Candy 4000 - Shadowlab
Add the name and copyright info.
To animate:
Close all the layers below the element: BIBIDARKNESS ELEMS (5) (with this layer included)
Merge visible all the open layers. Rename it: 1. Close it.
Open the layers closed and copy merged.
Open animation shop and paste as a new animation. Duplicate until you have 17 frames.
Open: SimoneAni261.mng
Activate the first frame, select all.
Animation - Cull Animation - Remove 1 frame every 5 frames.
Drag into the tag and place it in the center.
Back to psp. Open the layer 1 and copy, paste as a new animation in animation shop.
Duplicate until you have 17 frames.
Activate the first frame, select all. Drag into the tag and place it where it belongs.
Back to the animation & undo the drag action. Animation - Flip.
Animation - Reverse Frames. Resize the animation at 75 percent - bicubic.
Drag the animation into the tag again and place it in the bottom left side.
**Adding a background to the transparent animation.
Animation - Animation Properties
Change the back color for the color of your choice, mine is white.
Apply and the color will be applied in all the frames selected.
Change the speed to: 12, play the animation and save if you like! :)


No hay comentarios:
Publicar un comentario