Supplies Needed:
Psp
Tube of choice. Art by Amber Chen.
Scrap kit (PTU) Toxic Brew by Inzpired Creations here
Template KDHal3 by Dee'Sign Depot and Kandi Kissez here
Eye candy 5 Impact
Font here
Open the template. Dupliacate and close the original file.
Delete the layer:
Raster 1
dotted rectangle
Arrows
Activate the layer: Slats.
Colorize to match your tube.
Activate the layer: bottom orange circle.
Selections - All - Float - Defloat. Delete the original layer.
Open paper: 12. c/p in the canvas, Resize at 55 percent - Smart Size.
Selections - Invert. Edit Clear. Deselect.
Repeats for the layer: top orange circle.
Activate the layer: black rectangle.
Selections - All - Float - Defloat. Delete the original layer.
Open paper: 1. c/p in the canvas, Resize at 70 percent - Smart Size.
Selections - Invert. Edit Clear. Deselect.
Activate the layer: purple rectangle.
Selections - All - Float - Defloat. Delete the original layer.
Open paper: 13. c/p in the canvas,
Selections - Invert. Edit Clear. Deselect.
Activate the layer: left black square.
Selections - All - Float - Defloat. Delete the original layer.
Open paper: 4. c/p in the canvas, Resize at 50 percent - Smart Size.
Selections - Invert. Edit Clear. Deselect.
Repeats for the layer: right black square.
Activate the layer: frame bg.
Selections - All - Float - Defloat. Delete the original layer.
Open paper: 2. c/p in the canvas, Resize at 40 percent - Smart Size.
Selections - Invert. Edit Clear. Deselect.
Activate the layer: black frame.
Blur - Radial Blur:
Activate the layer: orange frame.
Selections - All - Float - Defloat. Delete the original layer.
Open paper: 7. c/p in the canvas, colorize to match the tube.
Selections - Invert. Edit Clear. Selections - Invert.
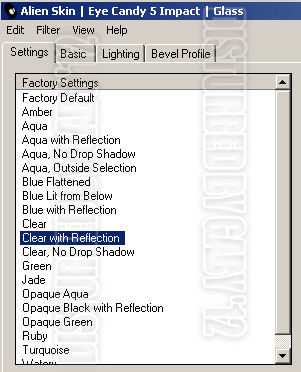
Add a new layer. Effects - Plugins - Eye Candy 5 Impact - Glass:
Colorize black and white.
Deselect.
Activate the layer: word art back.
Adjust - Add Noise:
Uniform
85 percent
Monochrome
Activate the layer: word art
Selections - All - Float - Defloat.
Open paper: 11. c/p in the canvas, Resize at 30 percent - Smart Size.
Selections - Invert. Edit Clear. Deselect.
Grab the freehand selection tool:
Low the opacity of the layer and make a selection around the word: licious
Edit - Clear. Deselect.
Open the tube. c/p in the canvas, resize if needed. Place it in the centerr.
Duplicate, apply gaussian blur: radius by: 3 pixels.
In the layer palette, change the blend mode to: Soft Light. merge down.
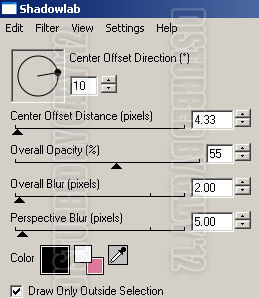
Effects - Plugins - Eyecandy 4000 - Shadowlab:
Open: web. c/p in the canvas, Resize at 70 percent - Smart Size.
Place it above the slats in the top left corner.
Open: Mirror. c/p in the canvas, Resize at 40 percent - Smart Size.
Place it above the web, in the top left corner.
Open: Scattered Leaves. c/p in the canvas, Resize at 70 percent - Smart Size.
Place it above the slats in bottom right corner.
Open: Book 1. c/p in the canvas, Resize at 70 percent - Smart Size.
Place it in the left side of the tag.
Open: Coffin 1. c/p in the canvas, Resize at 55 percent - Smart Size.
Place it next to the book.
Open: books 2. c/p in the canvas, Resize at 30 percent - Smart Size.
Place it up the coffin.
Open: Pumpkin. c/p in the canvas, Resize at 25 percent - Smart Size.
Place it above the coffin.
Open: Moon 2. c/p in the canvas, Resize at 50 percent - Smart Size.
Place it above the frame background.
Open: Fence. c/p in the canvas, Resize at 85 percent - Smart Size.
Place it above the glass frame.
Open: Grass 1. c/p in the canvas, Resize at 50 percent - Smart Size.
Place it in the right side of the fence. Duplicate. Image - Mirror.
Open: Wordart Framed. c/p in the canvas, Resize at 30 percent - Smart Size.
Place it below the tube layer.
Open: Bat 1. c/p in the canvas, Resize at 40 percent - Smart Size.
Place it in the top right of the tag.
Apply shadow to the template parts.
Effects - Plugins - Eyecandy 4000 - Shadowlab:
Sharpen the elements and apply shadow.
Effects - Plugins - Eyecandy 4000 - Shadowlab:
Add copyright and your name. Merge Visible, copy and paste as new image. Export as a png or jpg.


No hay comentarios:
Publicar un comentario