Supplies Needed:
Psp
Tube of choice. Art by Keith Garv, pruchase it here
Scrap kit (PTU) Fairy Dust by Inzpired Creations here
Mask 0113 by Trese here
Wordart of choice
Eyecandy 4000
Plugin: Xero here
Font here
Open a new image: 600x550
Open the paper: 12. C/p in the canvas, resize at 85 percent - Smart Size.
Open the closeup of the tube, c/p in the canvas. Place it.
In the layer palette change the blend mode to: Lighten.
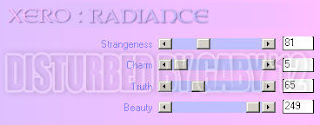
Effects - Plugins - Xero - Radiance:
Merge Visible.
Layers - Load mask: Trese Masks0113
Merge group.
Open the tube, c/p in the canvas, place it in the left part of the canvas.
Resize if it's needed.
Effects - Plugins - Xero - Porcelain:
Effects - Plugins - Eyecandy 4000 - Shadowlab:
Open: Clouds 1. c/p in the canvas, place it at the bottom part of the mask, remove the excess.
Open: Sparkles 3. c/p in the canvas, place it behind the tube, remove the excess.
Open: Lamp post 2. c/p in the canvas, resize: 420x385 pixels - Smart Size.
Place it behind the tube in the left side.
Open: Moon 3. c/p in the canvas, resize: 305x280 pixels - Smart Size.
Place it behind the tube in the left side.
Open: balloons. c/p in the canvas, resize: 328x301 pixels - Smart Size.
Place it behind the tube.
Open: c/p in the canvas, resize: 123x113 pixels - Smart Size.
Place it next to the balloons.
Open: Scattered Hearts 2. c/p in the canvas, resize: 350x321 pixels - Smart Size.
Place it at the bottom of the mask.
Adjust - Add Noise:
Uniform
35 percent
Monochrome
Open: Scattered Flowers 1. c/p in the canvas, resize: 380x348 pixels - Smart Size.
Place it at the bottom of the mask, above the hearts. Duplicate. Image - Flip.
Open: Scattered Petals. c/p in the canvas, resize: 300x275 pixels - Smart Size.
Place it at the bottom of the mask, above the hearts. Duplicate. Place it to the right.
Open: Flower 2. c/p in the canvas, resize: 100x92 pixels - Smart Size.
Copy and paste as a new selection several times and place it around the mask.
Open: Sparkles 1. c/p in the canvas, resize: 400x367 pixels - Smart Size.
Place it in the top of the mask. Duplicate.
Open the wordart of your choice. Resize if it's needed. Place it where you want it.
Selections - All - Float - Defloat. Delete the layer and add a new one.
Add drop shadow:
V: 0 H: 2
O: 100 B: 10
Pick a dark color from your tag, but not black.
Apply again drop shadow but change the blur to: 5 pixels.
Deselect.
Sharpen the elements.
Effects - Plugins - Eyecandy 4000 - Shadowlab:
Add copyright and your name. Merge Visible, copy and paste as new image. Export as a png or jpg.


No hay comentarios:
Publicar un comentario